


I always have these great ideas about making everyone gifts. Then it gets down to the last minute and I end up having picked ideas that are way too complex to complete in the time I have left.
Luckily: These cookies can be done in one day. I just finished them and they are beautiful! The cookies were so much fun to make and I gave them individually to bus drivers, teachers and I even have some for our neighbors.
If you feel like you are backed against the wall and don’t cook frequently or don’t have a lot of experience baking. Stop now! Don’t ruin your own Christmas trying to make everyone on your list happy. If you really aren’t looking forward to trying these ideas or you already are behind with other things: go pick up some cute ornaments and put them in some festive bags and call it done! You deserve a great Christmas season, too! If you think you can do these without going crazy: I guarantee these are fun, simple and they will be well received.

Stained Glass Cookies
You need:
A sugar cookie dough base (From scratch or pick up a bag of cookie mix from the grocer.)
Translucent hard candy (I used a bag of Jolly Ranchers)
Preheat your oven to 375 degrees F or follow the directions in your recipe or on your bag of cookie mix.
You can make these from scratch, but I’m too busy right now and I can find bagged cookie mix in the grocery store. These can definitely be done from scratch but you are adding more time and work to this that you don’t have to. If you buy a bag of sugar cookie mix: look for the directions on the back for cut out cookies and follow that recipe. You will either be adding a lot less butter or adding flour to the mix. I also don’t mind scraping cookies from cookie mixes into the trash if they don’t work out. The first batch I lost three out of twelve cookies. Part of it is my oven but the other part is you are combining two very different main ingredients: dough and hard candy. Getting them to come out perfect takes some work and practice.
However, those not so perfect cookies make great treats for my kids (and for me). We don’t care what they look like! The best thing about these cookies is they are impressive enough to give a single cookie as a gift. That means you have way less to do to have finished presents for people like your mailman or kid’s bus driver.
Make your cookie dough according to the directions for the cut out cookie recipe on the bag (or if you’re making a bunch of cookies and want to make yours from scratch: you can use your own recipe.)

Roll out your cookie dough on a floured surface. Keep adding flour to your rolling pin, cookie cutters and the surface of your dough as you go so the cookie dough behaves itself. You want these thin (otherwise: they will puff up and you will lose your design.) Aim for 1/4 inch thickness. Don’t worry, they will hold together with their rigid candy center.

I used a drinking glass to use as my original cut out for the cookies.

If you don’t get a clean outline with a glass: when you transfer the cookie to the baking sheet tap the side of the cookie with the flat side of a butter knife until you have a sharp edge on the cookie.

After you get your cookies cut out (and before you cut the second interior shape out): put them on a room temperature cookie sheet lined with parchment paper. (Yes. you definitely want to use the parchment paper and not just a non stick cookie sheet.)


I only bake 6 cookies a sheet with this method (These are large showy cookies. Don’t waste your time making little ones!) and the parchment paper keeps everything clean and reusing the sheets is easy.


Get out your interior cookie cutter. Pick something simple. My first batch had a snowflake design and it ended up being a mess with all of the points the candy had to melt into. Now I am using a heart shape and they turn out exactly like I want them too. Dip the cutter in flour between each cut out. If the dough doesn’t come up with the cutter use a butter knife to lift the interior out.
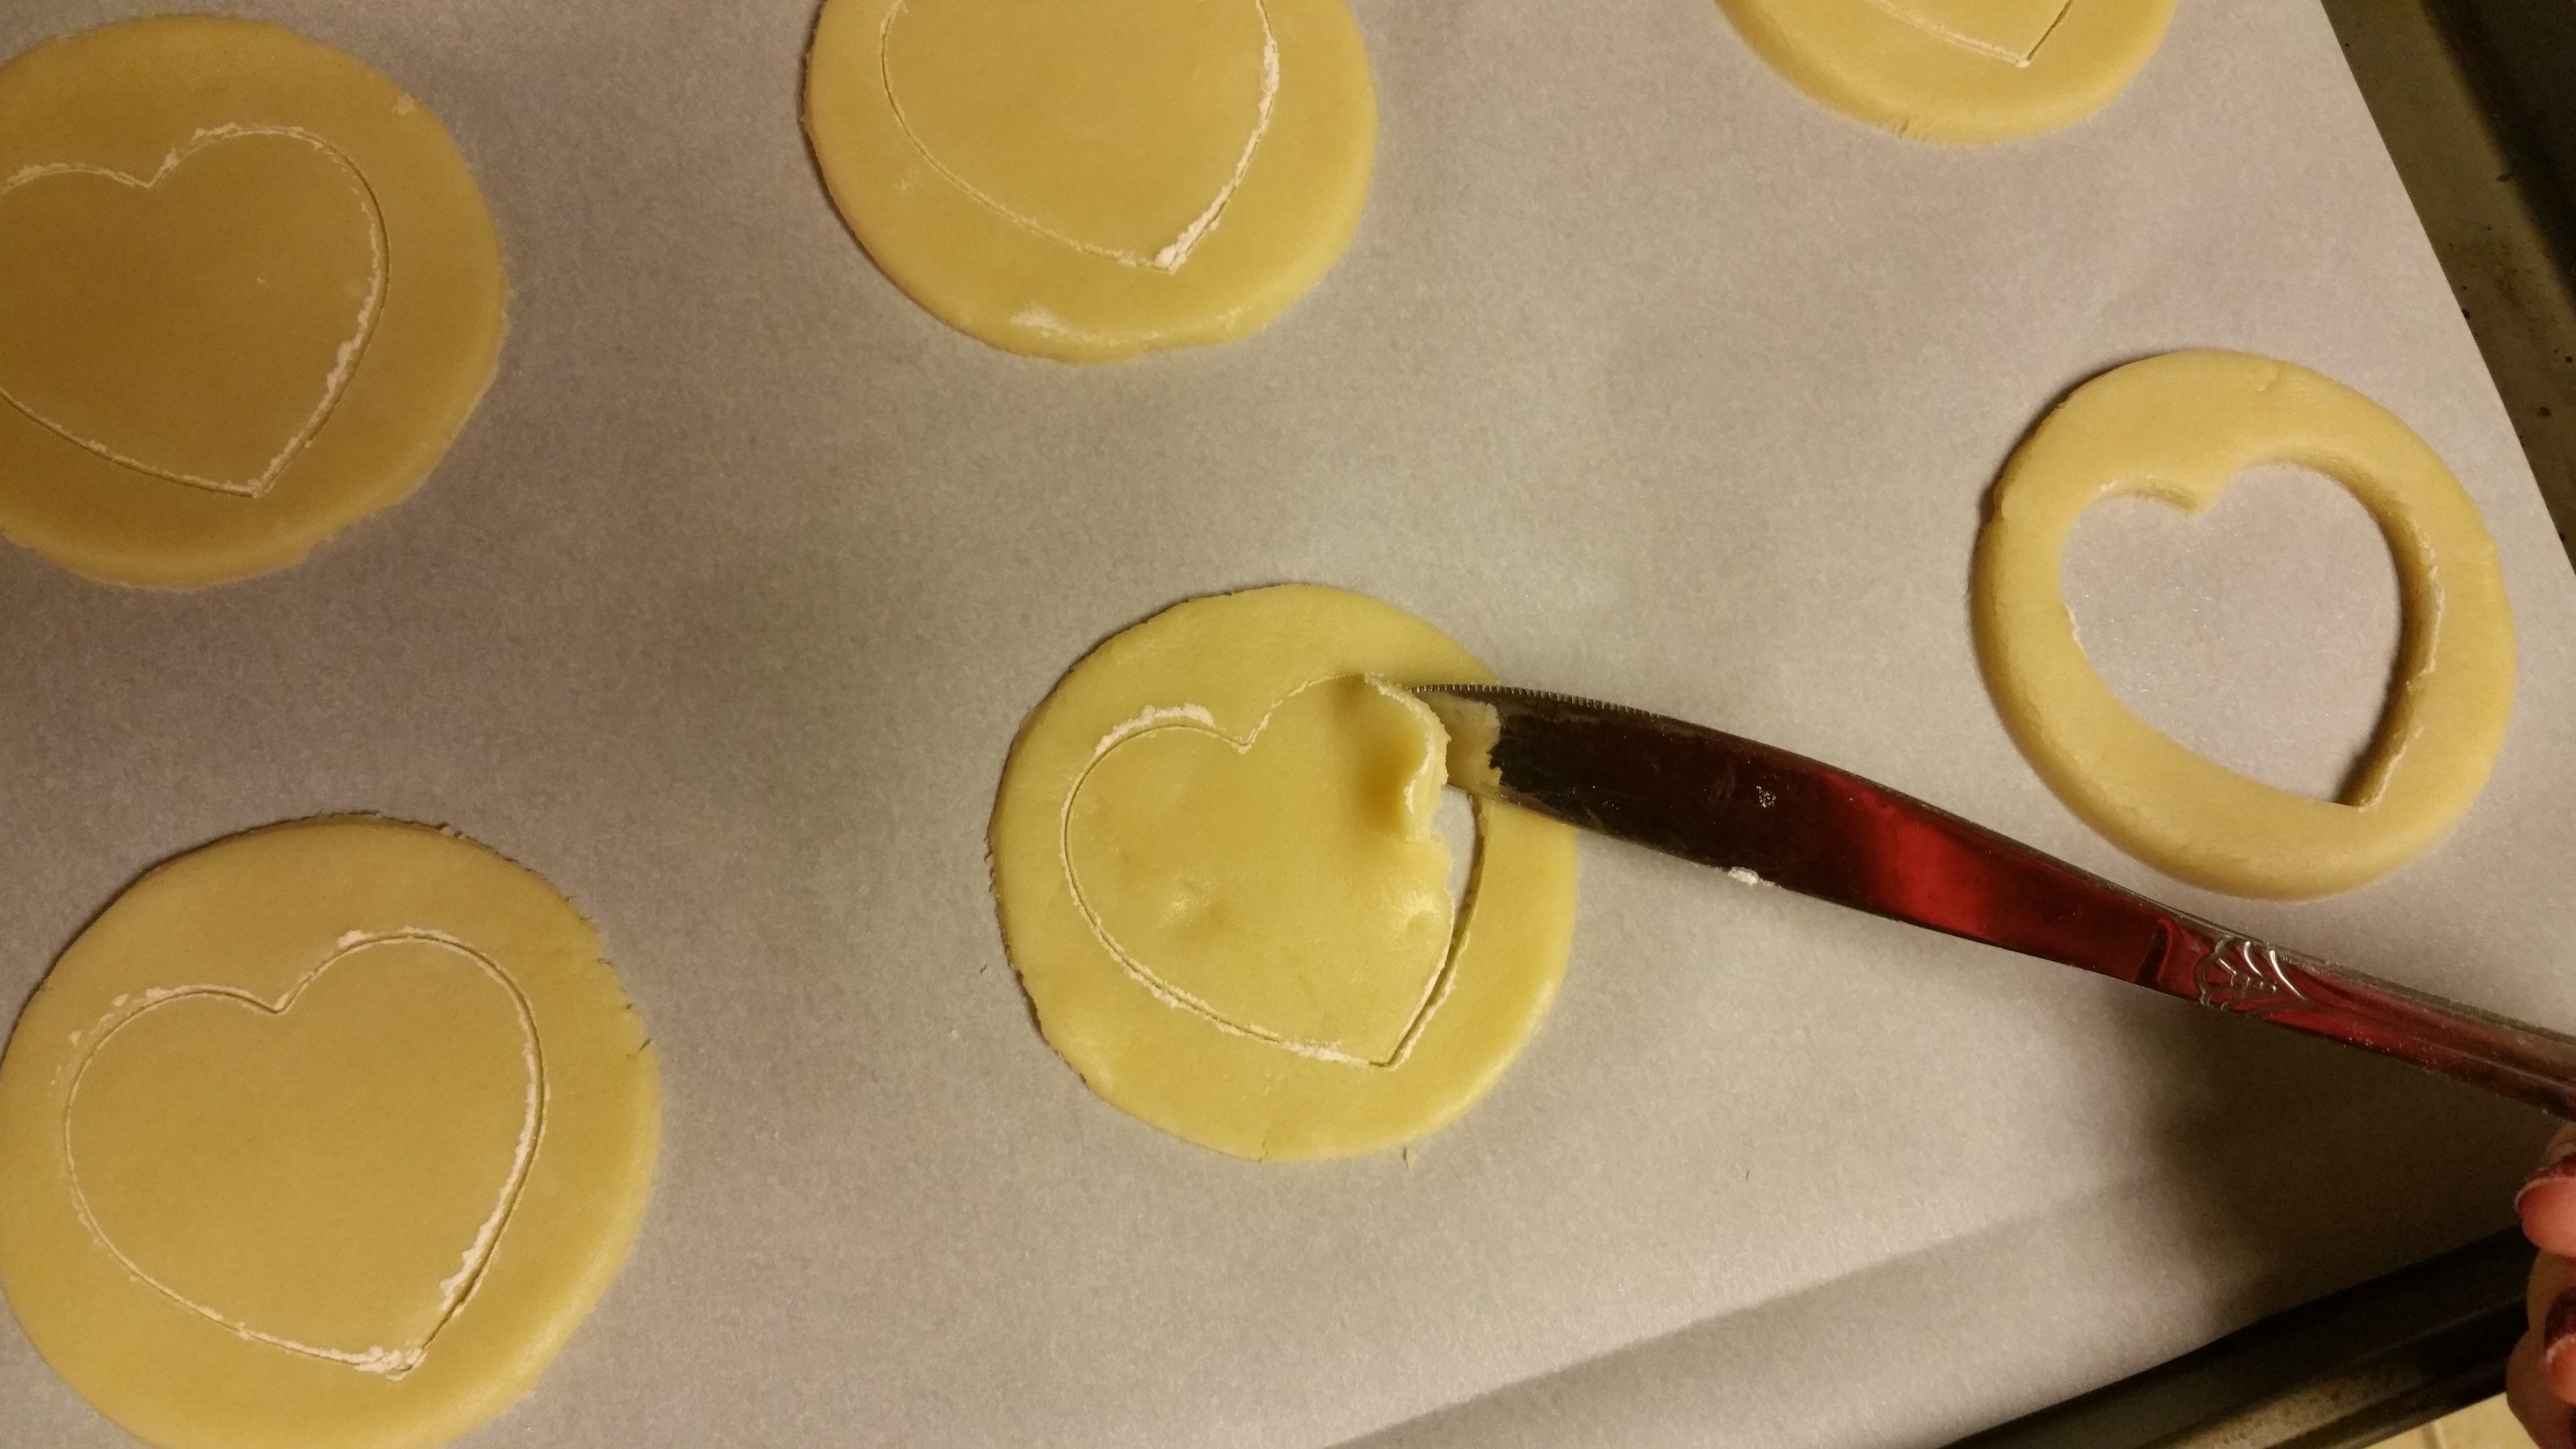
If you end up with a bunch of flour in the cut out: gently blow it out.

Refrigerate your tray! You need to do this to keep your cookie shape crisp. Put them in for 10-15 minutes. If you are stacking them in the fridge over what is already in your refrigerator: you can do it by arranging what is in there so they fit flatly.

When your trays are ready: take them out of the refrigerator and quickly add your hard candy to the center. From experience I have found that I need more than one candy per cookie. I suggest you bake a single cookie to test what you need to do, rather than end up with a mess and having a whole tray (or two) that didn’t work.

I recommend if you are going to add a second candy to the cookie, that you wait until half way through baking. I time my cookies for 3 minutes and then remove the trays from the oven, add the extra candy and put the trays back in (while switching the racks that the trays were on). After you put them back in the oven: Do not take your eyes off of them! They will go from unfinished to overdone very quickly. The main problem you will have with the candy is when it gets hot enough it will start bubbling and it will boil up and out of the cookie. Adding the second candy in the middle of the bake time lowers the temperature of the candy that is already baking.

Hopefully, this will keep the candy from boiling up and ruining the look of the cookie. Keep an eye on your cookies after you put them back in. Watch for bubbling: which can ruin the cookie if you let it get out of the center of the cookie. You want the outside of your cookie to just start to brown. Take them out and let them cool a minute or so before you slide the sheet of parchment, with the cookies, off onto the counter to finish cooling.

They should separate from the paper without the candy bending as you slide them off of your tray. (If you move them before the center has started to solidify you will break the cookies.) Be very careful of the candy while it is hot. This could potentially cause a very bad burn if it gets on your skin!
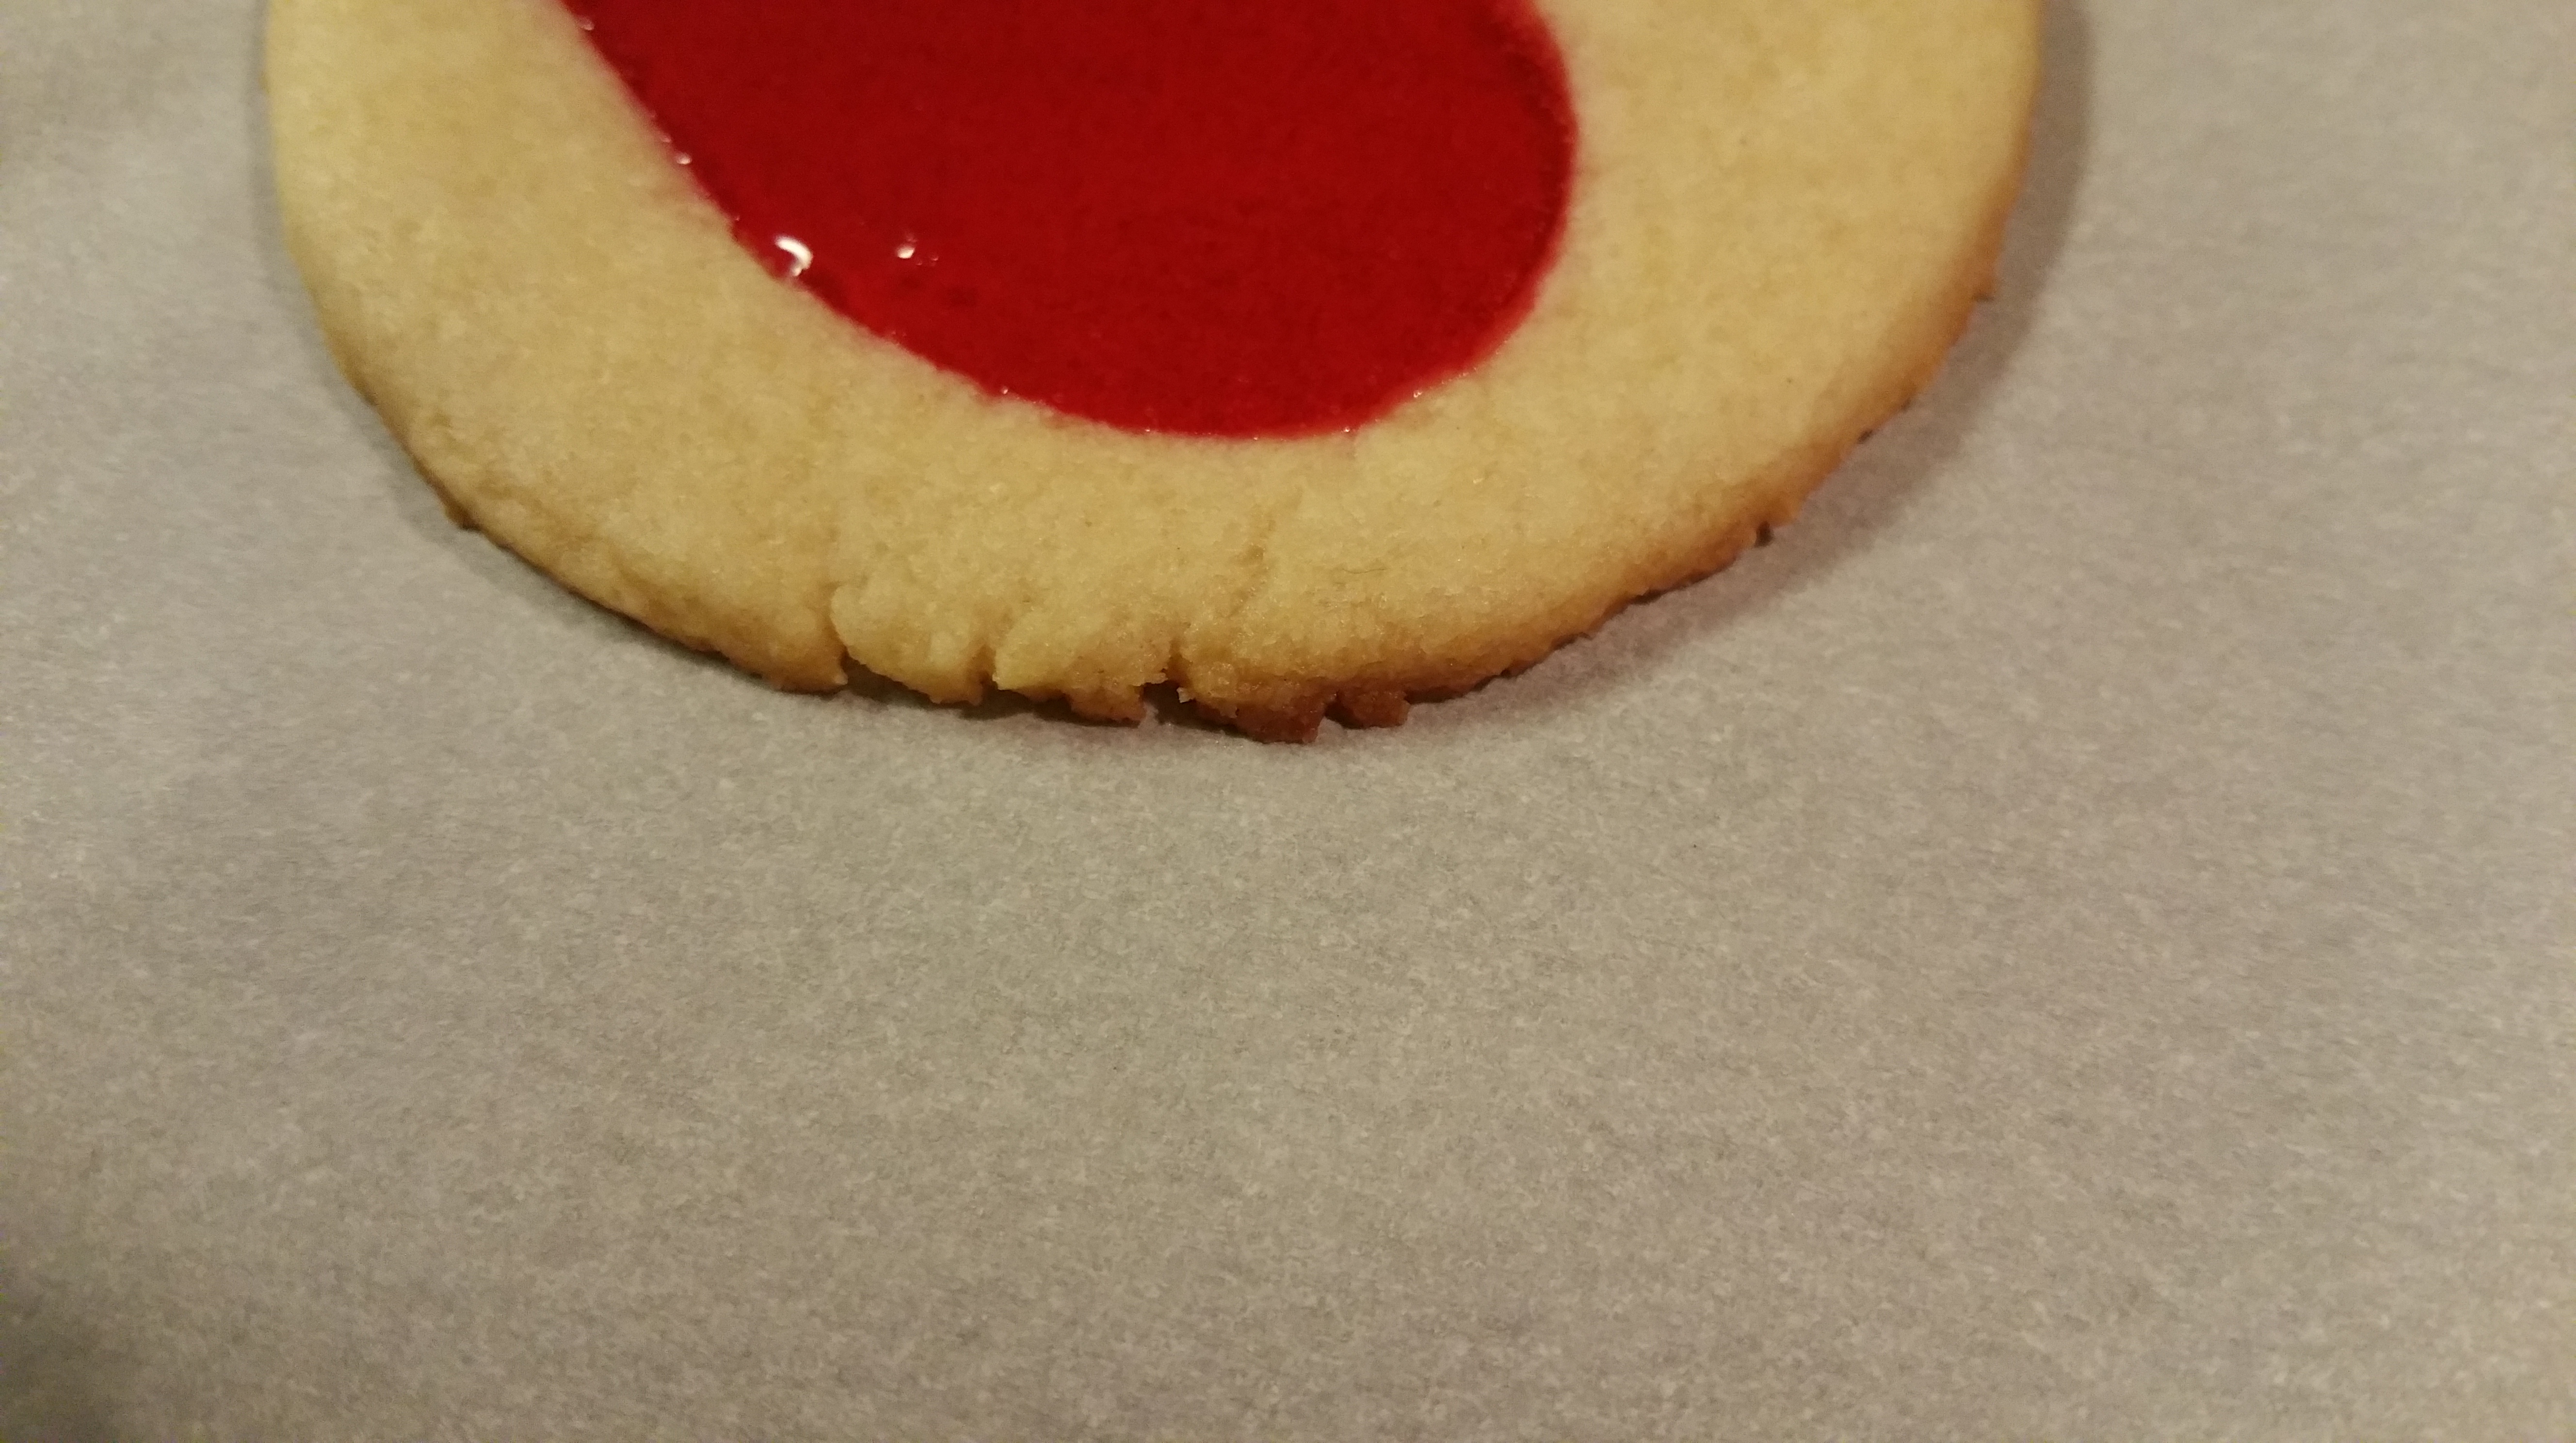

If you get the very outside of the cookie a little too brown you can take a knife and gently remove that portion while the cookies are still warm.

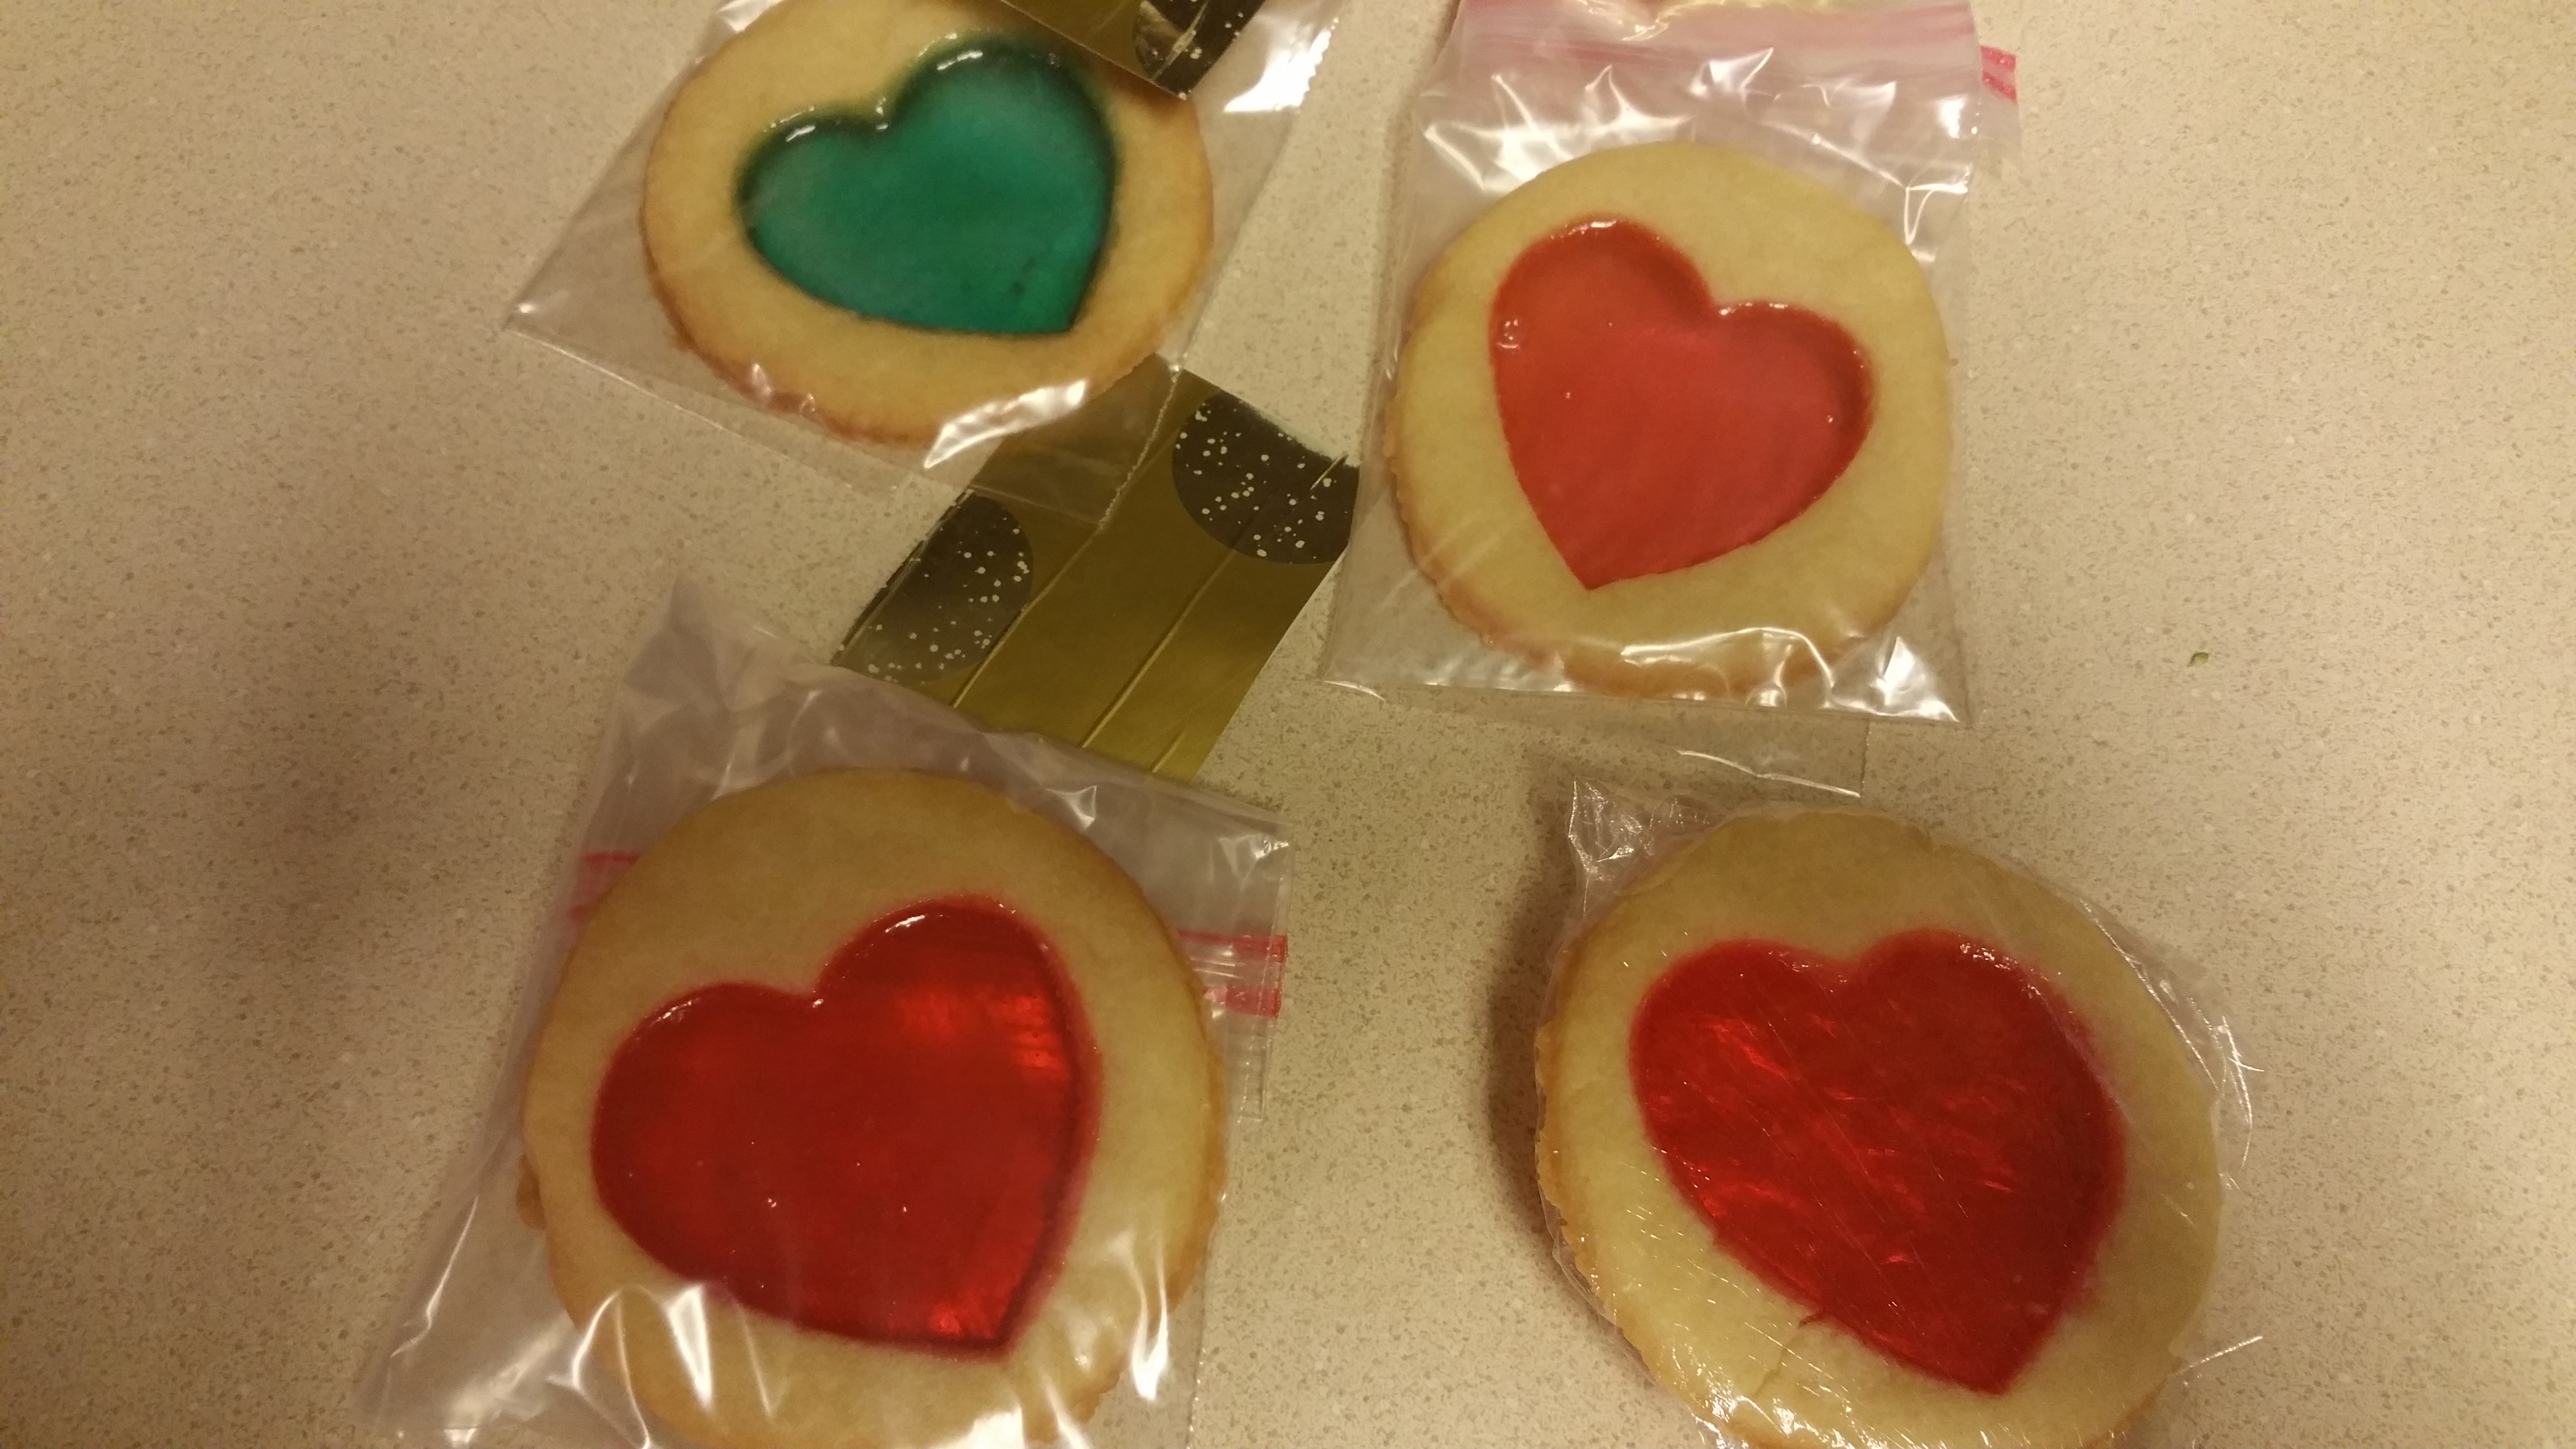
Make sure you wrap them in something clear because they are really pretty!

Cling wrap will make the cookie look even prettier if you fold the edges over the back. It creates a crinkling effect. If you are sending these to school or somewhere where you need more than one for a teacher and teacher’s aide(s): gently wrap them in a parchment paper envelope and stack them in a plastic container.

Tip the container gently to see if the cookies are in there solidly. I was able to send three cookies for teachers in a bento box with my youngest (and he didn’t destroy them in his backpack on the bus.) Make sure you let whoever you are giving these to know that they are to eat. They look like ornaments and I had a few people question what they were. They are truly beautiful and I was happy to give them out.
As you can see from the different colors these would be great ideas for a variety of holidays and celebrations. Choose the colors to match: Valentine’s Day, Easter, Christmas, your wedding or batchelorette party colors or birthday. You could find orange and black candy for Halloween. There are a lot of applications for these!

My last few tips are these:
1. Most recipes you find for these are for small cookies and some require you break the hard candy into pieces so they fit into those small cookies. Don’t bother with those. It is nearly impossible to break hard candy without having pieces shoot across the room and stick to everything. Also, they won’t be impressive enough to give as single gifts if they are small.

2. After you take the cookies out (to put the second candy in): squat down and watch these through your oven window. If you see the candy flatten out and start to bubble: they are probably done. They will brown a little more as they start to cool. So, it’s better to have them just done than a little brown.

3. Get to know your oven! If you have a gas oven (like I do), move the racks as far away from the heat source as you can. If you are lucky enough to have a convection oven: turn it on! If you notice that the cookies are starting to brown differently in the oven: take advantage of the fact that you remove these 1/2 way through cooking, and rearrange the trays so that all areas of the trays have a turn in the hot spot.

4. Store the cookies between the parchment you used to cook them on. I just cut the used parchment in half and continually fold it over and add more parchment strips as I add cookies.

5. If you are giving more than one to someone: pick a plain white or silver paper plate. The cookies are incredibly beautiful and patterns behind them will just distract from their beauty. If you are giving just one and the recipients are not formal ones (like your kid’s bus driver or teacher, instead of your boss or someone else you’d like to really impress) you can just drop them in a ziplock bag folded over and stapled with a piece of wrapping paper used for a tag. You could get fancy with glassine envelopes (or just make your own out of more parchment paper) and add ribbon and tags. Whatever you do (and no matter how you choose to present them): the cookies will impress!
If you post your finished product, remember where you got your instructions and please link back to my page! Thanks and Merry Christmas!!!
Discover more from Crazy Green Thumbs
Subscribe to get the latest posts sent to your email.

They look amazing!
Thank you! I really enjoy making these. You don’t see cookies like these every day! Thanks for coming by and commenting. I appreciate the visit!