


I live in Texas. Things get hot fast and our springs are usually very hot, windy and dry. Putting out transplants is tough. If you are using grow lights and have sprouted your seed indoors (or if you bought from a nursery that grew inside a greenhouse): your plants are not going to like immediate full sun and wind.

Most people take their seedlings through a “hardening off” process, which involves slowly exposing your seedlings to outdoor life. I hate this process because it just takes one day to kill your plants. (Plus, it’s a lot of work if you are starting a lot of plants.) It just takes one time: where you get busy and forget to go get your plants and move them inside, (or to a shadier spot.) Just one day you forget to water. One day that isn’t perfectly timed.
I am not great at being aware of things I’m not completely focused on, and that includes how long I’ve left my seedlings out in full sun. It’s so frustrating to baby seeds for weeks, to months, to grow viable plants and then kill them with a single day that you get distracted.


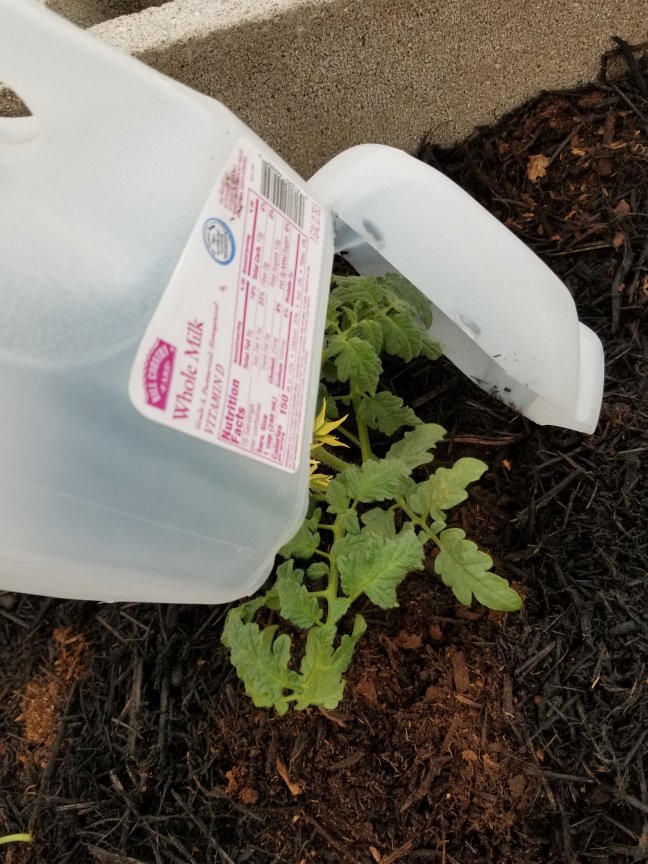
So, I have figured out a way around it. I’ve been doing this for years and I’m always successful. My secret is: milk jugs. I create miniature greenhouses for whatever transplants I’m putting out. They go straight from indoors to the garden and I never lose any. The milk jugs are semiopaque to filter sunlight and they’re wind proof. It offers my plants some respite until they grow some new roots and harden off on their own. You can make clear plastic gallon jugs, from juice or other things, semiopaque by sanding the outside of the plastic with sandpaper until you are happy with the results, but milk jugs are ready to go.
If you are educated in gardening products, you may recognize these as a type of garden cloche. If you choose to buy something similar, a plastic garden cloche online will run around 20 bucks. If you have been a gardener for any significant amount of time you would laugh at that price to protect 1 plant. Milk jugs= free, handy and deliver the exact same results!

My summer plants, like tomatoes, are large and (along with peppers and eggplants), I use seedlings instead of direct sowing seed. I don’t need to transplant a lot of seedlings in summer because most of what I grow is direct sow. In spring, I direct sow even more. But I have almost a year round growing season. Still, if you took the time to start your seed, this is a great time saver and insurance policy for their survival.

I don’t have to move them. It doesn’t matter if I forget them. Nothing is a struggle with this option. Here’s how I do it:
1. You will need as many gallon milk jugs as you have seedlings to protect. This is not hard for our family. We drink tons of milk. If you, or your family, don’t go through much milk: you can save milk jugs over a season until you have enough, ask your neighbors to contribute their empties, or go around the neighborhood and grab whatever is out on recycling day.
I clean mine out by running some water into the jug and putting some dish soap in. I put the cap back on and shake them vigorously. If they are gross and have a rotten milk smell, add a little laundry bleach to the above and that should get rid of the smell.
These can be stored by stacking the jugs. Cut the base back, flip the bottom out, nest the end with the handle and neck inside the next one and string them together on some twine. In this way you can also store them to reuse from year to year.

2. These should be gallon jugs. If your seedlings would fit in quart milk jugs, they may not be ready for the garden and they won’t have much space to grow inside the jug once they’re outside.

3. You want to cut the bottom ALMOST all the way off. Leave a space of a couple of inches, that is still attached, under the handle.

4. Flip the cut side out away from the jug.

5. Plant your plants with some slow release fertilizer.


6. Place the jug over your plant.
7. Place a rock on, or landscape pin through, the side that is flipped away from the jug: to steady it so it won’t blow away.

8. Water your seedlings as often as needed to keep them moist but not wet.
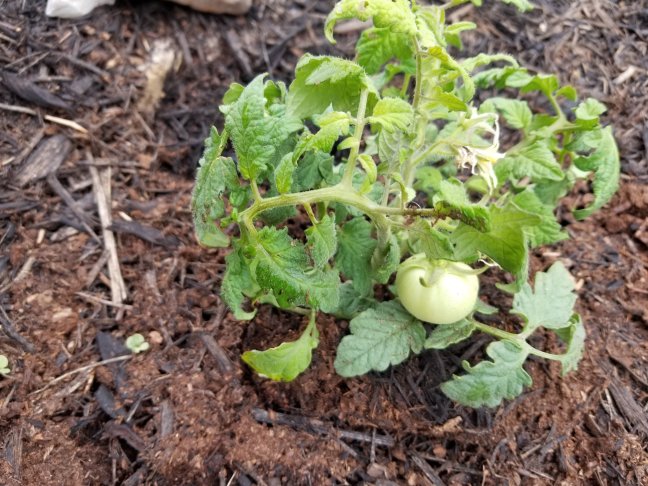
9. After about a week, remove the jug. Your seedlings should be growing well at this point and ready to take outside exposure. If it’s really hot and dry out, you can remove the jug for a few hours and put it back on for the hottest part of the day. I don’t think I’ve ever had to do that, though.

A few things to remember:
Hot and dry is an excellent recipe for spidermites. You can spray your seedlings with a light coat of neem oil if it isn’t above 80 degrees outside. If it’s already pretty hot, or you don’t want to spray, take the jug off every few days and spray the plant down with water from the hose. This will keep the bugs at bay. Wait until the leaves are dry to replace the jug. But: don’t do this if you don’t already have spidermites. It can cause fungal issues if you keep the leaves wet.
Push the milk jug down into the soil and you can replace the cap if you want. Slugs and snails will enjoy your mini greenhouse if they can get inside. You can also put organic slug bait around your plants if snails and slugs are a big problem in your area. (Iron based pellets are sold here: slug bait, these are safe to use around edibles)
If you want to keep your interior warmer, put the cap back on the jug. This will also keep spidermites and other creatures off of your plants, but only if they are totally free of pests to begin with.
If you want to keep the plants free of powdery mildew, and you don’t want to use neem oil, save some of the milk from the jug you’re using and mix it with water. Spray your seedlings prior to taking them out to the garden. Your mix should be 40% milk and 60% water, spray all surfaces until dripping. Any more milk than that can cause different fungal issues. You don’t want to grow cheese and yogurt out there!
I personally wouldn’t use dish soap or baking soda on seedlings, although those are options for bugs and fungus, respectively.
There you go! A completely easy way to avoid detailed hardening off! Let me know how it works for you!
Meet you out in the garden to talk to our happy plants!
Crazy Green Thumbs

That is such a good idea!
I’m glad you enjoyed it! Thanks for coming by, I appreciate the visit!
Good to know! I don’t have milk jugs, but I have plenty of plastic water jugs…