


I got a call the other day from a neighbor. “I have seven bricks, do you want them?”
“Yes! Yes, I do!”


I have plans for bricks, and free ones are the best kind! These plans were sparked by regularly spending hours on Pinterest (Can’t sleep? It’s Pinterest time!) and randomly remembering a few pins where people painted bricks (or pavers) like books.

There are differences between bricks and pavers. Bricks are fired, like pottery and can end up much smoother than pavers. Pavers are poured concrete and aggregate, they’re usually pretty rough. Bricks can have holes through them (these are called extruded bricks). The holes allow the bricks to dry faster, use less material, weigh less, and provide an area for mortar to bind the bricks together. Holes are beneficial to walls, drying and transport, but: not so accurate for painting to look like a book.
Paver

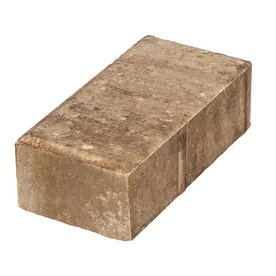
My neighbor’s bricks turned out to be pavers, which were even better for this project! Pavers are solid cast concrete and gravel, and they look a lot like the shape of a book. They’re easy to find at your local hardware store (and usually cost less than a dollar each), that is: if you don’t have a cool neighbor that donates some to you!
Either non extruded bricks (no holes) or pavers will work for this project. So, it was a big bonus that these were pavers. They were free and without holes! Yay!

The first thing you’ll want to do is scrub these clean with soap and water and allow them to dry. My pavers weren’t new, so they were covered in algae and dirt. Clean them enough to paint on. You don’t need to be perfect.

After they are totally dry, you want to work on the basic color of the cover of your book. Why? Because the “pages” take more time to get right and you don’t want to accidentally slop some “cover” color on them. I also made a trip to Hobby Lobby and got outdoor acrylic craft paint. I’m hoping it holds up better than the generic acrylic craft paint I already had.

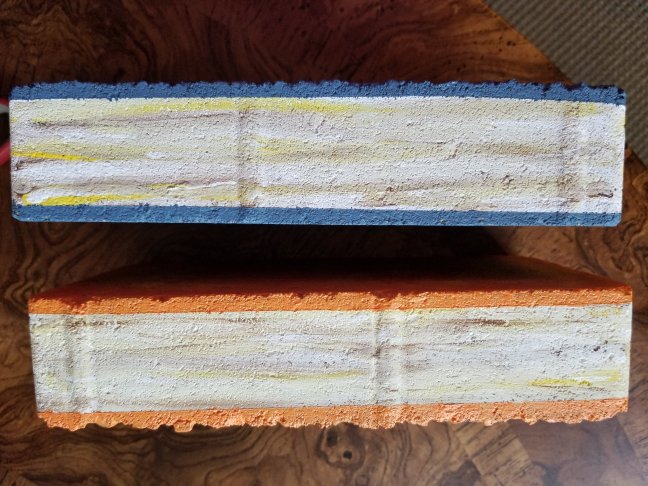
Paint three sides in a solid color of your choice: paint both large sides and one connecting narrow side for the bound edge, let dry and start on the pages. The page sides will all be narrow sides. I bought a bunch of different colors of paint (although you really only need white, black and primary colors). If you use a color and run out, or if you are trying to do these over several days, having an entire bottle of the color you are using is handy. You don’t have to worry about saving the tail ends of your mix for tomorrow, or matching your colors if you run out, or ending up with a lot of extra that you don’t have a container for.

Getting the pages right is pretty simple, your goal is to streak the side of the paver “book” with slightly different hues of white, brown and cream. Start with a nice thick, wet coat of white and a small, squared bristle brush. I didn’t mix the page colors before adding them to the sides of the pages.

I used brown and yellow with the white. I added small blobs of color to the brush, and let the brush mix them on the “book”. I found that this was the best way to go. Using a dry brush technique at the end, with minimal white, will make the pages look finished. You can’t screw this up. If you don’t like what you did, paint it again until you do.

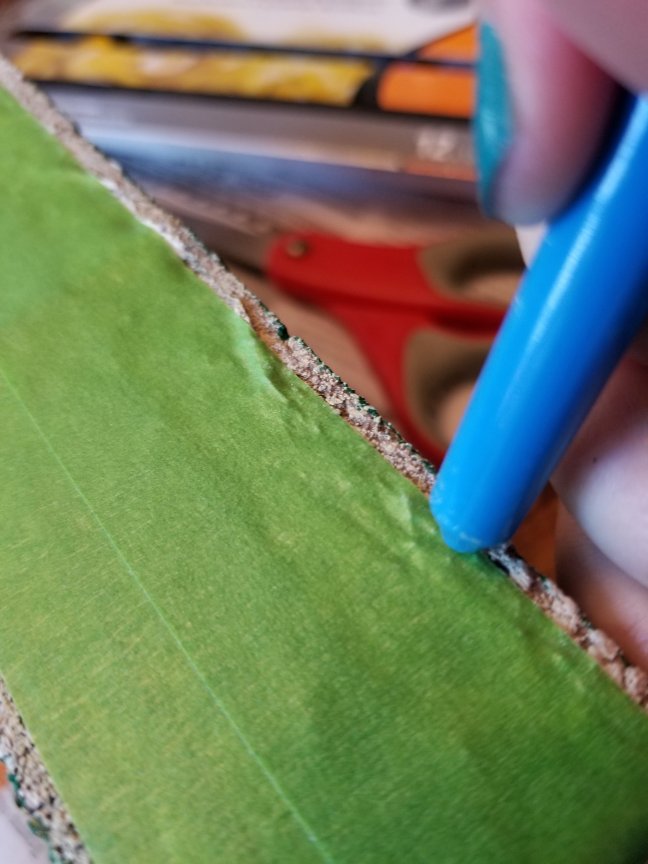
Let the page sides dry completely. Next you want to tape off the center of the page sides to make the “bound edges” wider. You can also use a t-square or ruler. It’s up to you. I found a roll of frog tape in the garage that I bought when painting my son’s room. I’d never opened it. Wow! It is impressive! I got super straight lines on very rough pavers. (You can get your own here: link) I am definitely going to use it on our walls next time I paint and need exact lines!

Let the details dry completely.
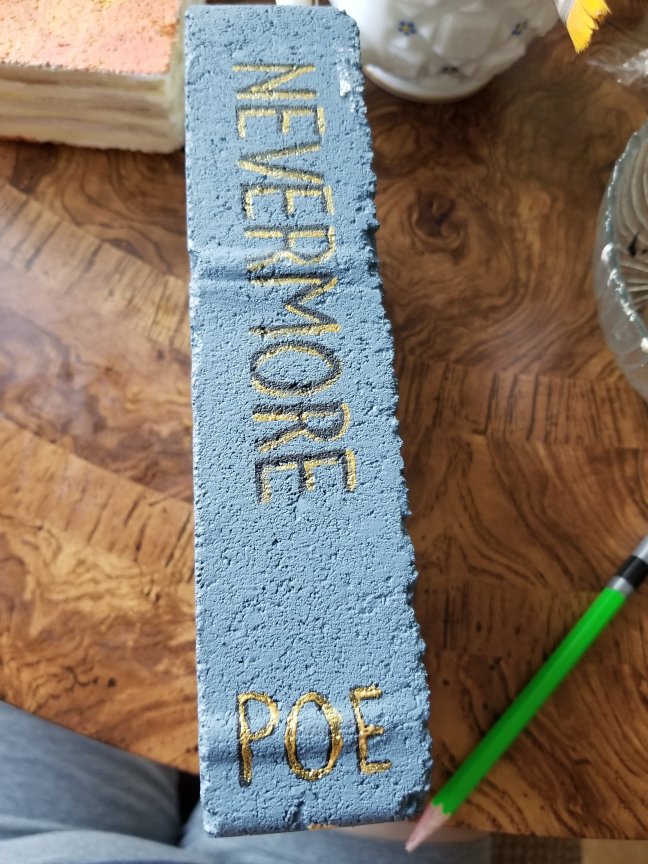
Now comes the fun part: The artwork on the cover! You can look online for cover art for your favorite books (or look at books that you own) and copy them. Alternatively, you can use fancy gilding (like old law books have) and skip titles. You can make up your own artwork or just paint the title on the spine of your book (or your favorite word from the book, like I did on “The Raven” book. Crafting should be fun, rules are never fun!) I decided to make some books from my childhood. I have a long list of favorites. I chose to make the free pavers into books and then get some different sized pavers at the store and make more. That will be a more realistic library look, since real books come in all sizes.
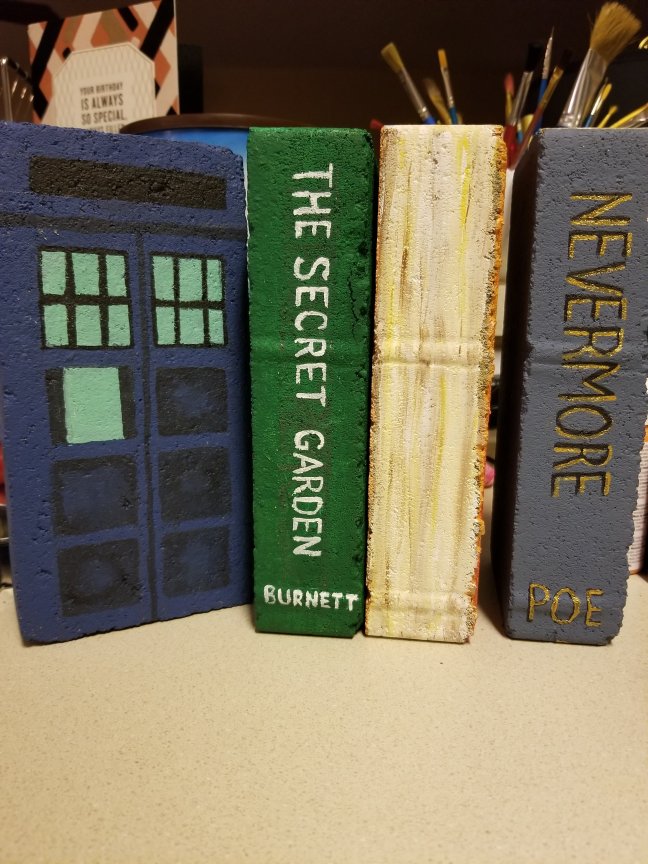
Books and the obligatory TARDIS! (Note that I didn’t even attempt the lettering. I’ve made other TARDIS crafts and that much sloppy lettering just ruins the look. If you know what a TARDIS is, then you’ll recognize it like this.) BTW Come on BBC! Fix Doctor Who! I don’t have time for your stupid experiments! Season 11 just sucked. Big thumbs down from our family! Sorry. I’m a passionate fan. On with my instructions…
If you don’t have really neat handwriting or a cutting machine (like a cricut), you can choose to skip wording. Or you can use a regular printer and print out the title on thick paper, cut the words out with an exacto knife and carefully sponge on the titles, but that’s going to be a lot of work. If you trust yourself, you can freehand, like I did. I actually own a cricut maker but I didn’t use it for this project. It depends on your goal with your books. It would look much nicer with a stencil of your making, but I’m OK with mine.

I don’t like my painted script, but I did freehand the title and spine on the books and I’m happy with them. However, I knew (after I started the basic book colors), that straight lines were going to be really difficult on this rough surface. I was OK with the limitations it presented.

You can keep the lettering straight with a strip or two of painter’s tape as guides. Don’t use permanent markers on this. Although it would be easier to use for some details, if you seal it with lacquer: the lacquer will dissolve the ink. Plus, permanent markers sun bleach easily. They are not good for outdoor projects.

As far as intricate decorations, I’ve seen these types of paver books online, filled with nonsanded grout and then painted. I have also seen what I believe was printed paper, glued over the grout. Using grout will give you a flat, clean surface. You will be able to put a lot more detail on that sort of surface. But, it’s another step and I’m currently doing 7 “books”. At number 4: I’m done trying to be perfect.

The background was the first thing I did, then I drew everything with pencil, I painted the pages, then the details and text, I painted the cover overlap on the pages and then sealed it with clear spray lacquer. I like how they turned out.
Grouting or stenciling is definitely a choice you can make for your project, but I’m already getting tired of painting, so I’m just using them as they are: without grout. I didn’t want to apply the grout and then possibly sand. It’s just too much extra work for something I’m putting outside on the ground!

Also, if you modge podge printed pages on the bricks, and you put them outside in your garden, they will sunbleach and get ruined. If you are going to go that route, then the bricks would be better used inside, as bookends. After you are done decorating your book, seal your work with a clear lacquer and allow that to dry. You can use several coats here.
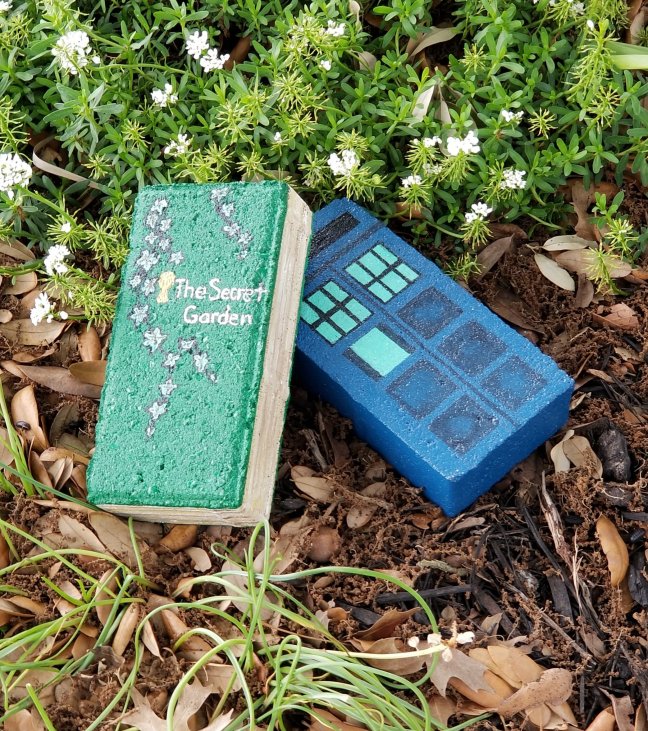
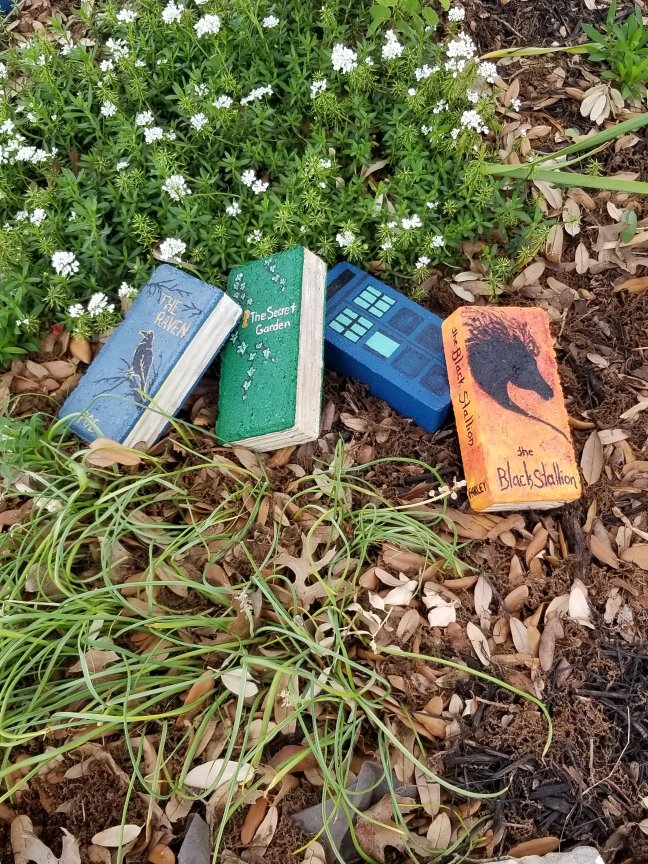
Once they’re dry you’re done! Place your books out in your garden and enjoy your honorary library of your favorite literary gems!


Discover more from Crazy Green Thumbs
Subscribe to get the latest posts sent to your email.

These are great, I especially love the TARDIS!
Thank you! They were fun to make!
We just opened a community library. Would LOVE to make these. Thanks for the idea!
Awesome! 🙂
Great blog. I’ll shortly be posing one about gardening in brutal desert areas and common misconceptions about it. It can be done, but it’s hard. There are very few things more rewarding than getting a good harvest in a difficult area.
(To make things clear, I get no compensation whatsoever from the blog and info I present, just as I don’t get any from the few hundred starts I give away every year. It’s just a good thing to do.)
Hard to believe but true: Some of us just want to make the world a better place.
Hi. Great idea. Love the concept. Up-cycling/ Recycling. Happy Pavers Time. Have a wonderful day. Goff
This is so cute! I’ve been wanting to put some sort of paver stones around my raised beds and this will be a prefect project!
I made the same thing! My brick book is ‘Peter Pan’ … great minds!
I love your blog! What part of Colorado are you in? My kids were born in the Springs, my husband is from Denver. Beautiful state!
Thank you so much 🙂 I’m in Keenesburg which is about 45 minutes northeast of downtown Denver. Where are you?
We’re near San Antonio, in Texas.
We’re talking about moving to Texas when my son goes off to college (not for 7 years or so) San Antonio sounds like a really great place!!
It’s beautiful! But really, really hot. Summer is the downtime here in my garden. It gets above 100° until late, sometimes after midnight. But I have an almost year round growing season. I love the people down here. Everyone is friendly!
Those are amazing…and some of my favorite books by the way!! Awesome project!
Thank you! They were really fun. Although my book list to make is a lot longer. I was lucky that my kids took two because otherwise I’d still be painting! Thanks for coming by, I appreciate the visit!
I need to try that and make one for my book. lol How wonderful!
Love this idea! So fun!
I am so impressed! Great work.
What a fantastic idea! I’m definitely going to try this over the summer. Thanks for sharing–and thanks for visiting my blog. 🙂
This is a very nifty craft idea! I would so love to do this sometime for some decorations in my front yard. I enjoy reading, and ohmigosh, the TARDIS! Lovelovelove! (Even though I haven’t really watched since Matt Smith… *blushes*)
My favorite doctor from the reboot (I used to watch the old reruns in the 80s) is Capaldi. A lot of people were put off by his grouchy persona but some of the best writing was during Capaldi and he took the character places Smith and Tennant couldn’t have. I didn’t like him at first, but I stuck it out and I’m glad I did. The doctor was a lot deeper character under Capaldi and he was supposed to stay the doctor for several more years. I think the story arc would have been worth it. Plus, Missy was awesome! But this last season was awful. I got three episodes in and just couldn’t go any further. They’ve upset the fan base. It was awful.
Wow, that I’ll need to see! I don’t get why people would be put off by his “grouchy persona.” Because everybody loves a good grouchy persona these days, like look at Greg House on House MD. I totally need to get caught up on Doctor Who, so I can see for myself. I think it was in 2012-ish when I stopped, before they took Doctor Who off of Netflix. I do recall the announcement of when Capaldi was going to be the new regeneration.
If you do finish who, let me know what you think! Thanks for coming by and commenting! I appreciate the visit!
Really cool!
Thank you!
Your paintings are wonderful. And, thanks for stopping by my blog today.
Thank you! I’m glad you liked them!
I love this – such a cool way of decorating the garden and repurposing old bricks! ☺
I had fun with these! I’m glad you liked them. Thanks for the visit!
Best idea for bricks ever! Loving Poe…
Thank you! I’m glad you like it!
Adorable!!
Love the ideas. Thanks for a step-by-step with lots of pictures…
Thanks for the follow. Now I’ll follow you. Awesome website.
Thank you! I’m glad you enjoyed it!
Love these!!
Thank you!
What a great idea!
Thank you! It was a fun project!
Wow!! This was impressive. When I opened the post and looked at them for the first time, they didn’t look like pavers at all. They look perfect and excellent. The effects you gave to them were so good and eye catching. I don’t know what all to say about this. And thanks a lot for mentioning the steps as well.
Thank you! I’m glad you liked them! They’re a fun project. Thanks for coming by, I appreciate the comment!
I absolutely love these! You are very creative and talented!! Such a neat idea. I’m impressed with your painting skills, especially that Black Stallion.
I have a lot of practice drawing horses, I was a horse crazy kid! Thanks for the compliment! I really appreciate the visit!
Wow, they’re fantastic. I must try it out.
I’m glad you liked them! Thanks for coming by!
These are super cute!
Thank you! They were fun to make!