

One of the draws of raised beds (especially if you have heavy native clay soil) is the the great drainage it provides. However, the drainage in a raised bed can also become an issue in high summer heat. This is a great example of how some things are extremely helpful in one season (like drainage during wet springs) but can become a problem in others (low water retention in dry, hot summers). Down here in South Texas our summers are both hot and dry, with weeks above 100 degrees and little to no rainfall. Preparing for drought is part of running a cost effective garden. I don’t want to have to add any extra money into growing home produce.
If you grow your own veggies you are probably very aware of the cheap seasonal produce at the grocer that requires no work on your part. Sometimes it makes your struggles and efforts seem larger than life…but there is nothing like home ripened vegetables and you are in total control of what chemicals have been added to your food. Despite the labor and costs: there are more reasons to grow your own food than there are reasons to skip doing it!
Since drought is a big issue down here: this is my solution to our dry, hot summers.

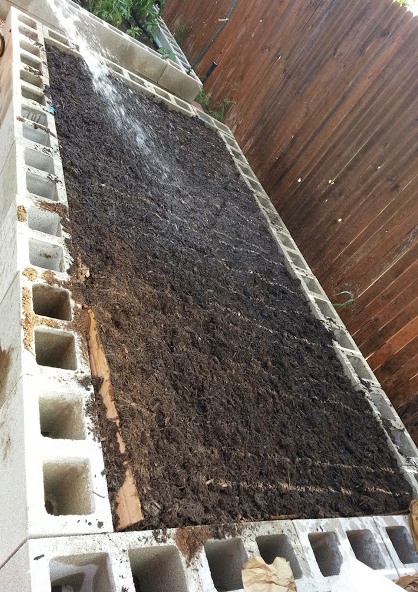
I’m starting out with a drought resistant bed. This bed is a permanent addition to the garden. It will take very little work to maintain, requires no tilling and has a sponge-like water retentive layer within it. We have water restrictions right now and have started out the year at the lowest our aquifer has ever been in the spring. Saving water is vital to raising cost effective vegetables and remaining responsible users of our city’s water supply. My corn is already silking here in the last weeks of May. Our main growing season is nearing it’s end. It will soon be followed by intense heat and a dry summer. Summer is our down time. It is hard to get anything to survive the heat. I will be planting and maintaining heat tolerant and drought resistant vegetables in this bed like: okra, peppers, beans and melons.
I’m a huge fan of soaker hoses. This is how I choose to water my summer beds. As you can see I put painter’s tape to mark where the lines run. Water follows the path of least resistance, which in this case is straight down. You will want to plant your seedlings along the lines to ensure that they receive enough water while they are small and vulnerable.
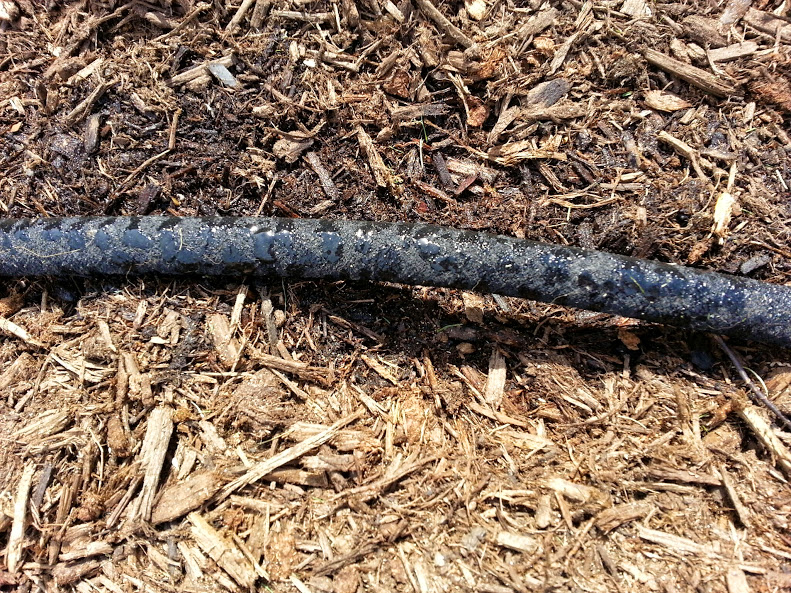
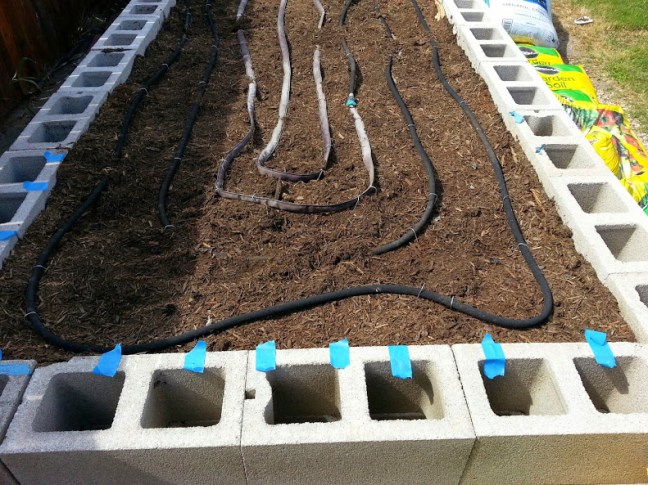
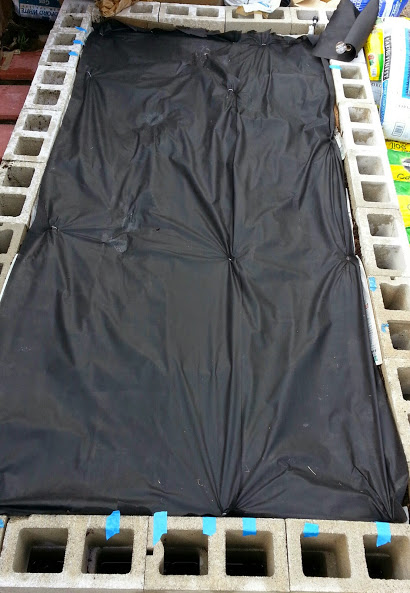
Marking where your lines run is also a good idea. Painters tape is fast and easy to use…plus I already had some! The next phase in creating a water wise bed is to create a layer that will stop evaporation. Remember to wet as you go. Covering a dry bed will only make watering it more difficult.
Most places in the US have less heat and wetter summers that we do down here. This bed would still ensure that you will need to use much less water. Down here, I wouldn’t be able to effectively grow in the summer without using something like this. No matter your weather: this is an extremely low maintenance option that any gardener can use (once you put in the effort to build it.) Putting the original effort in the beginning (by building a hugelkultur type bed) will make the years you use the bed almost maintenance free and offer your plants a deep, near ideal growing medium.
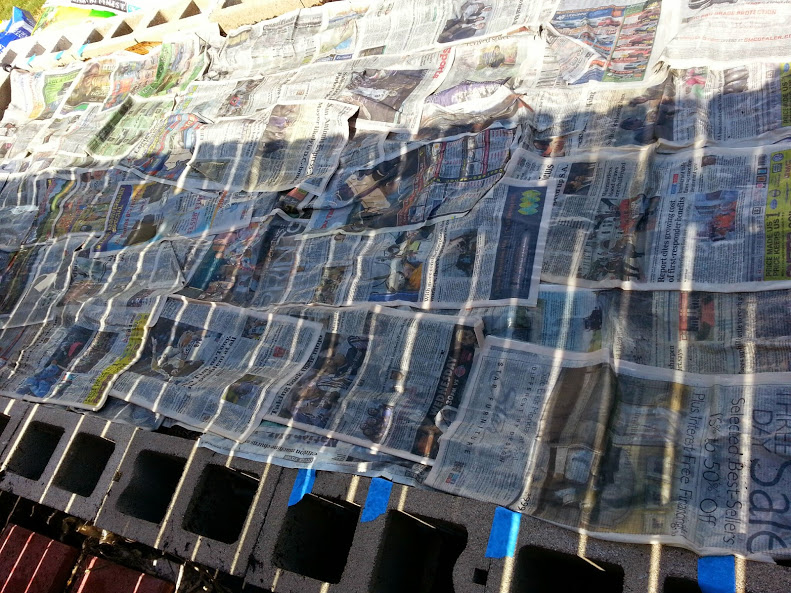
You need to be prepared with what you will be putting over the newspaper. You need a thick layer of mulch and/or landscape fabric. I always live in high wind, dry areas. I can’t use mulch that will easily blow around like straw would. I need something heavy so I choose wood mulch.
Before you decide to create a water barrier like this: you need to realize that water retention works both ways. It will keep water within the bed that you add with the soaker hose but it will also keep water out if you try and water from above the newspaper. You will need to be committed to using the soaker hose, but you will use much less water than if you are watering from above with no newspaper mulch layer. I also have a hose splitter and a water timer that I use. There are quick release nozzles for use with soaker hoses as well. This would make the process quick if you have multiple hoses you are attaching to. The combination of all of my choices: water timers, mulch layers, hugelkulture raised bed and soaker hoses; makes for near maintenance-free gardening. I ensure my success by using these features. I can even go out of town and not worry about the garden!
I choose to use cheap landscape fabric as a layer in between the mulch and the newspaper for a couple of reasons:
1. If the mulch shifts, the bed is still completely sealed.
2. I can rake off the wood mulch I put over the top every year and reuse or compost it. The landscape fabric makes this process easy. I don’t mix wood mulch into the upper layers of soil. Decomposing wood draws nitrogen away from plants and large wood chips (the kind that make it through our high winds) would dehydrate the bed if used in the upper layers of soil.
I am all about putting effort in early (when I have the motivation and nice weather) so I can reap the rewards later (when it’s too hot to do much outside!)
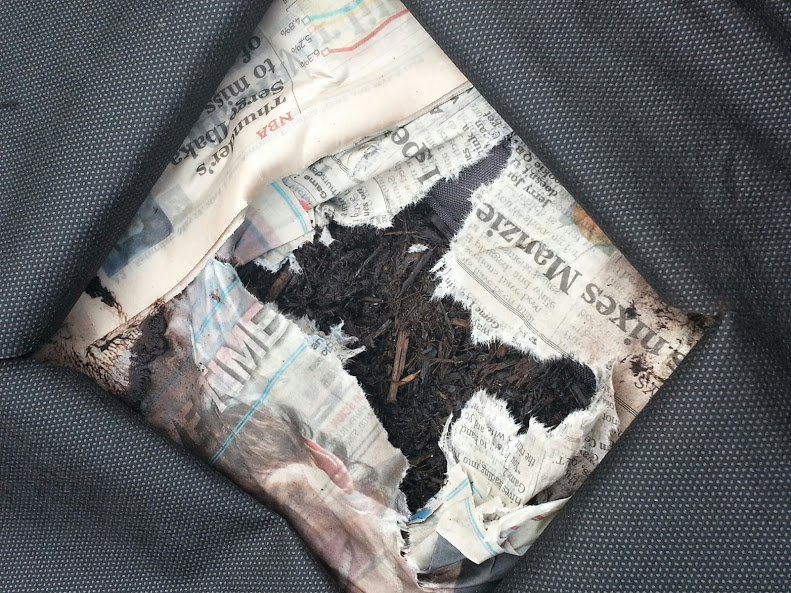
The next thing you do is use a knife or scissors to carefully cut holes in the fabric and plant through it. You will need to make large enough holes to accommodate your mature plants. I make an “X” in the fabric and tuck the loose pieces back under the rest of the fabric.
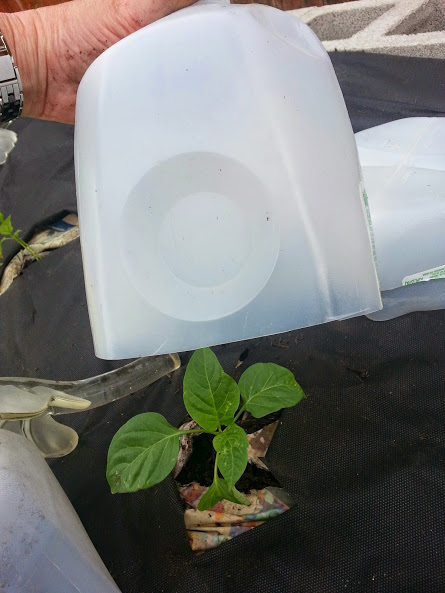
Make sure you plant along the hose.

Carefully mound a thick layer of mulch around the areas that are not planted. Plug your garden hose into the soaker hose and water when the beds gets dry (stick your finger into the exposed soil near the hose where you planted your seeds or seedlings and you should feel moisture. If you don’t: it’s time to water.)

You will need to water often until your plants are established. After that, you can slow down on the regular watering and enjoy the water retention this type of bed offers!
You now have a water-wise planting bed that should survive any weather mother nature sends your way!
Get out there and plant something and enjoy your summer gardening!
Discover more from Crazy Green Thumbs
Subscribe to get the latest posts sent to your email.

This is incredible! A labor of love 🙂
Thank you! Yes, I do love the results I get with this. Thank you for stopping by. I appreciate it!
Very nice.
Thank you!
Love this! I’ve thought about using cinder block but thought it might get too hot & raise temp of bed. If it works for you, it ought to work in North Texas. I am going to try this, maybe get started this winter. Glad you visited my blog & *liked* “Loving Orange.”
It does work down here. The problem is everything gets hot in the summer! I’m glad you enjoyed the post. Thanks for coming by. I appreciate it!
Lots of work up front, but rewards later (home grown vegetables and few weeds). We do not need to go to such lengths in the Appalancian Mountains because of Spring & Summer thunderstorms, but we do put down soaker hoses for the weeks when rain passes us by. Some years we do not need them. We also use grey water through the growing season on our flower beds.
Oscar
I wish we had that kind of water! But the disease and insects would probably enjoy that too. Thank you so much for coming by! I appreciate the visit.
Thanks for sharing!
Thank you for the visit!
Hey! Fabulous post you got here. Whadya do with those plastic water jugs in the last photo?
Stuart
Thank you for catching that! Milk jugs are my favorite addition to my garden! I use a ton of them for a lot of different things. This is what I am using them for in the photo: “Shortcut Through the Hardening-Off Process” Another way I use milk jugs is in this post “The Seed Collector’s Insanity (Tips And Tricks For Starting Your Seeds)“
Dear crazygreenthumbs
Thank You for finding my blog and liking my post. 🙂
Wow, You have an amazing blog and comments from very interesting bloggers!
I think it is great what You do and write, I just have a small balcony, but it is packed full with plants! This year I decided to plant mostly herbs and leaf salad and beans , nearly no flowers. A balcony for food and medicine!
And yes, homegrown veggies are the best, I totally agree! And I love Your solution of this bed for hot weather and little rain. And also the upcycling of materials. 🙂
Keep up the good work,looking forward to read more from Your blog.
Greetz from the herbalist balcony gardener across the ocean,
Eleni
Thank you so much for the compliment! Your video post of “photoshop” beauty gave me a much needed laugh. I really love your blog! Thanks for the visit.
I enjoyed your post. Gardening is my passion, and it is always pleasant to see what others are doing.
Thank you. I’m glad you liked it. I appreciate the visit!
Fabulous info for a newbie gardener. Photos are VERY helpful too. Glad I found you!
I’m glad you liked it! I hope I can help you on your gardening journey. Thanks for commenting. I appreciate it!
Random question: Have you ever used a rain barrel as the water source for your soaker hose? I like the idea of using natural rain water for the garden, but I wonder if the barrel would have enough pressure to fill the soaker hose.
To do that successfully I would bet you’d need a pump or to have your barrel significantly higher than your garden. If you try it: make sure you’ve got a screen over the hose connection so you don’t plug the soaker with algae from your barrel. I don’t have a way to use my rain barrel like that without a pump. But then I’d be running a pump so I’m not sure I would gain anything by using rain water. If you can figure out a way to create a strong enough gravity feed to your hose or find a solar powered pump it could certainly work but you’d have to experiment.
Great info! We just moved this June so I’m only container gardening the rest of this summer, but I’m building my raised bed for fall (maybe) and next year as we speak! I’m not very knowledgeable of the climate where we are now (Maryland), but will do some research and decide if your technique is a good route for my raised bed.
Get in touch with your county extension office. Just put the name of your county and “county extension” in your search bar. They will have specific growing information for your area. Good luck with your new garden and thanks for stopping by!
Here in the country, I have gone totally to soaker hoses. They sold them at Sam’s club this year for less than $6 for two 50′ hoses. I live on such a windy hill that water from a sprinkler just blows away and evaporates before my garden gets a drop. When I planted my green beans and other crops, I “double rowed” them, meaning I planted the two rows 12″ apart. Down their middle I put the soaker hose. The path to walk is between those two rows and the next two. Just makes a really fat, 12″ row. The beans are now two feet tall and producing like crazy, and I never have moved the soaker hose, I just hook up to the end of it to water. I will roll it up in the fall and use it again next year. I have used a rain barrel to gravity feed the water, but you have to have a roof to fill the barrel nearby. Also, a soaker hose sometimes plugs up. You can take a thumbtack out and poked holes in them if it gets too bad, but they are so inexpensive you may just want new ones.
Wish I had known about Huglekulture back when I lived in town! What a great idea. I’m going to try it on my dry hillside next year.
I should post a photo of your garden. If I had the space, a tractor, my cousins to help out and your soil I’d be a happy camper. Maybe I just need to move back to Kansas? Thanks for coming by mom, I appreciate it.
I love double rows like that, they are easy to water and maintain. I tend to hodge podge everything to avoid insect plagues. This year I am on rock, so raised beds it is!