


Get my new e-book on Amazon! It’s free with Kindle Unlimited or $3.99 to purchase. There are projects in this e-book that you won’t find anywhere else, like: a tutorial for my 20 foot spiderweb; Solid, fast human shaped forms and more; plus all of the tutorials you can find on my website. There’s 14 total tutorials and they’re all in one place. Check it out now by clicking on the above photo!


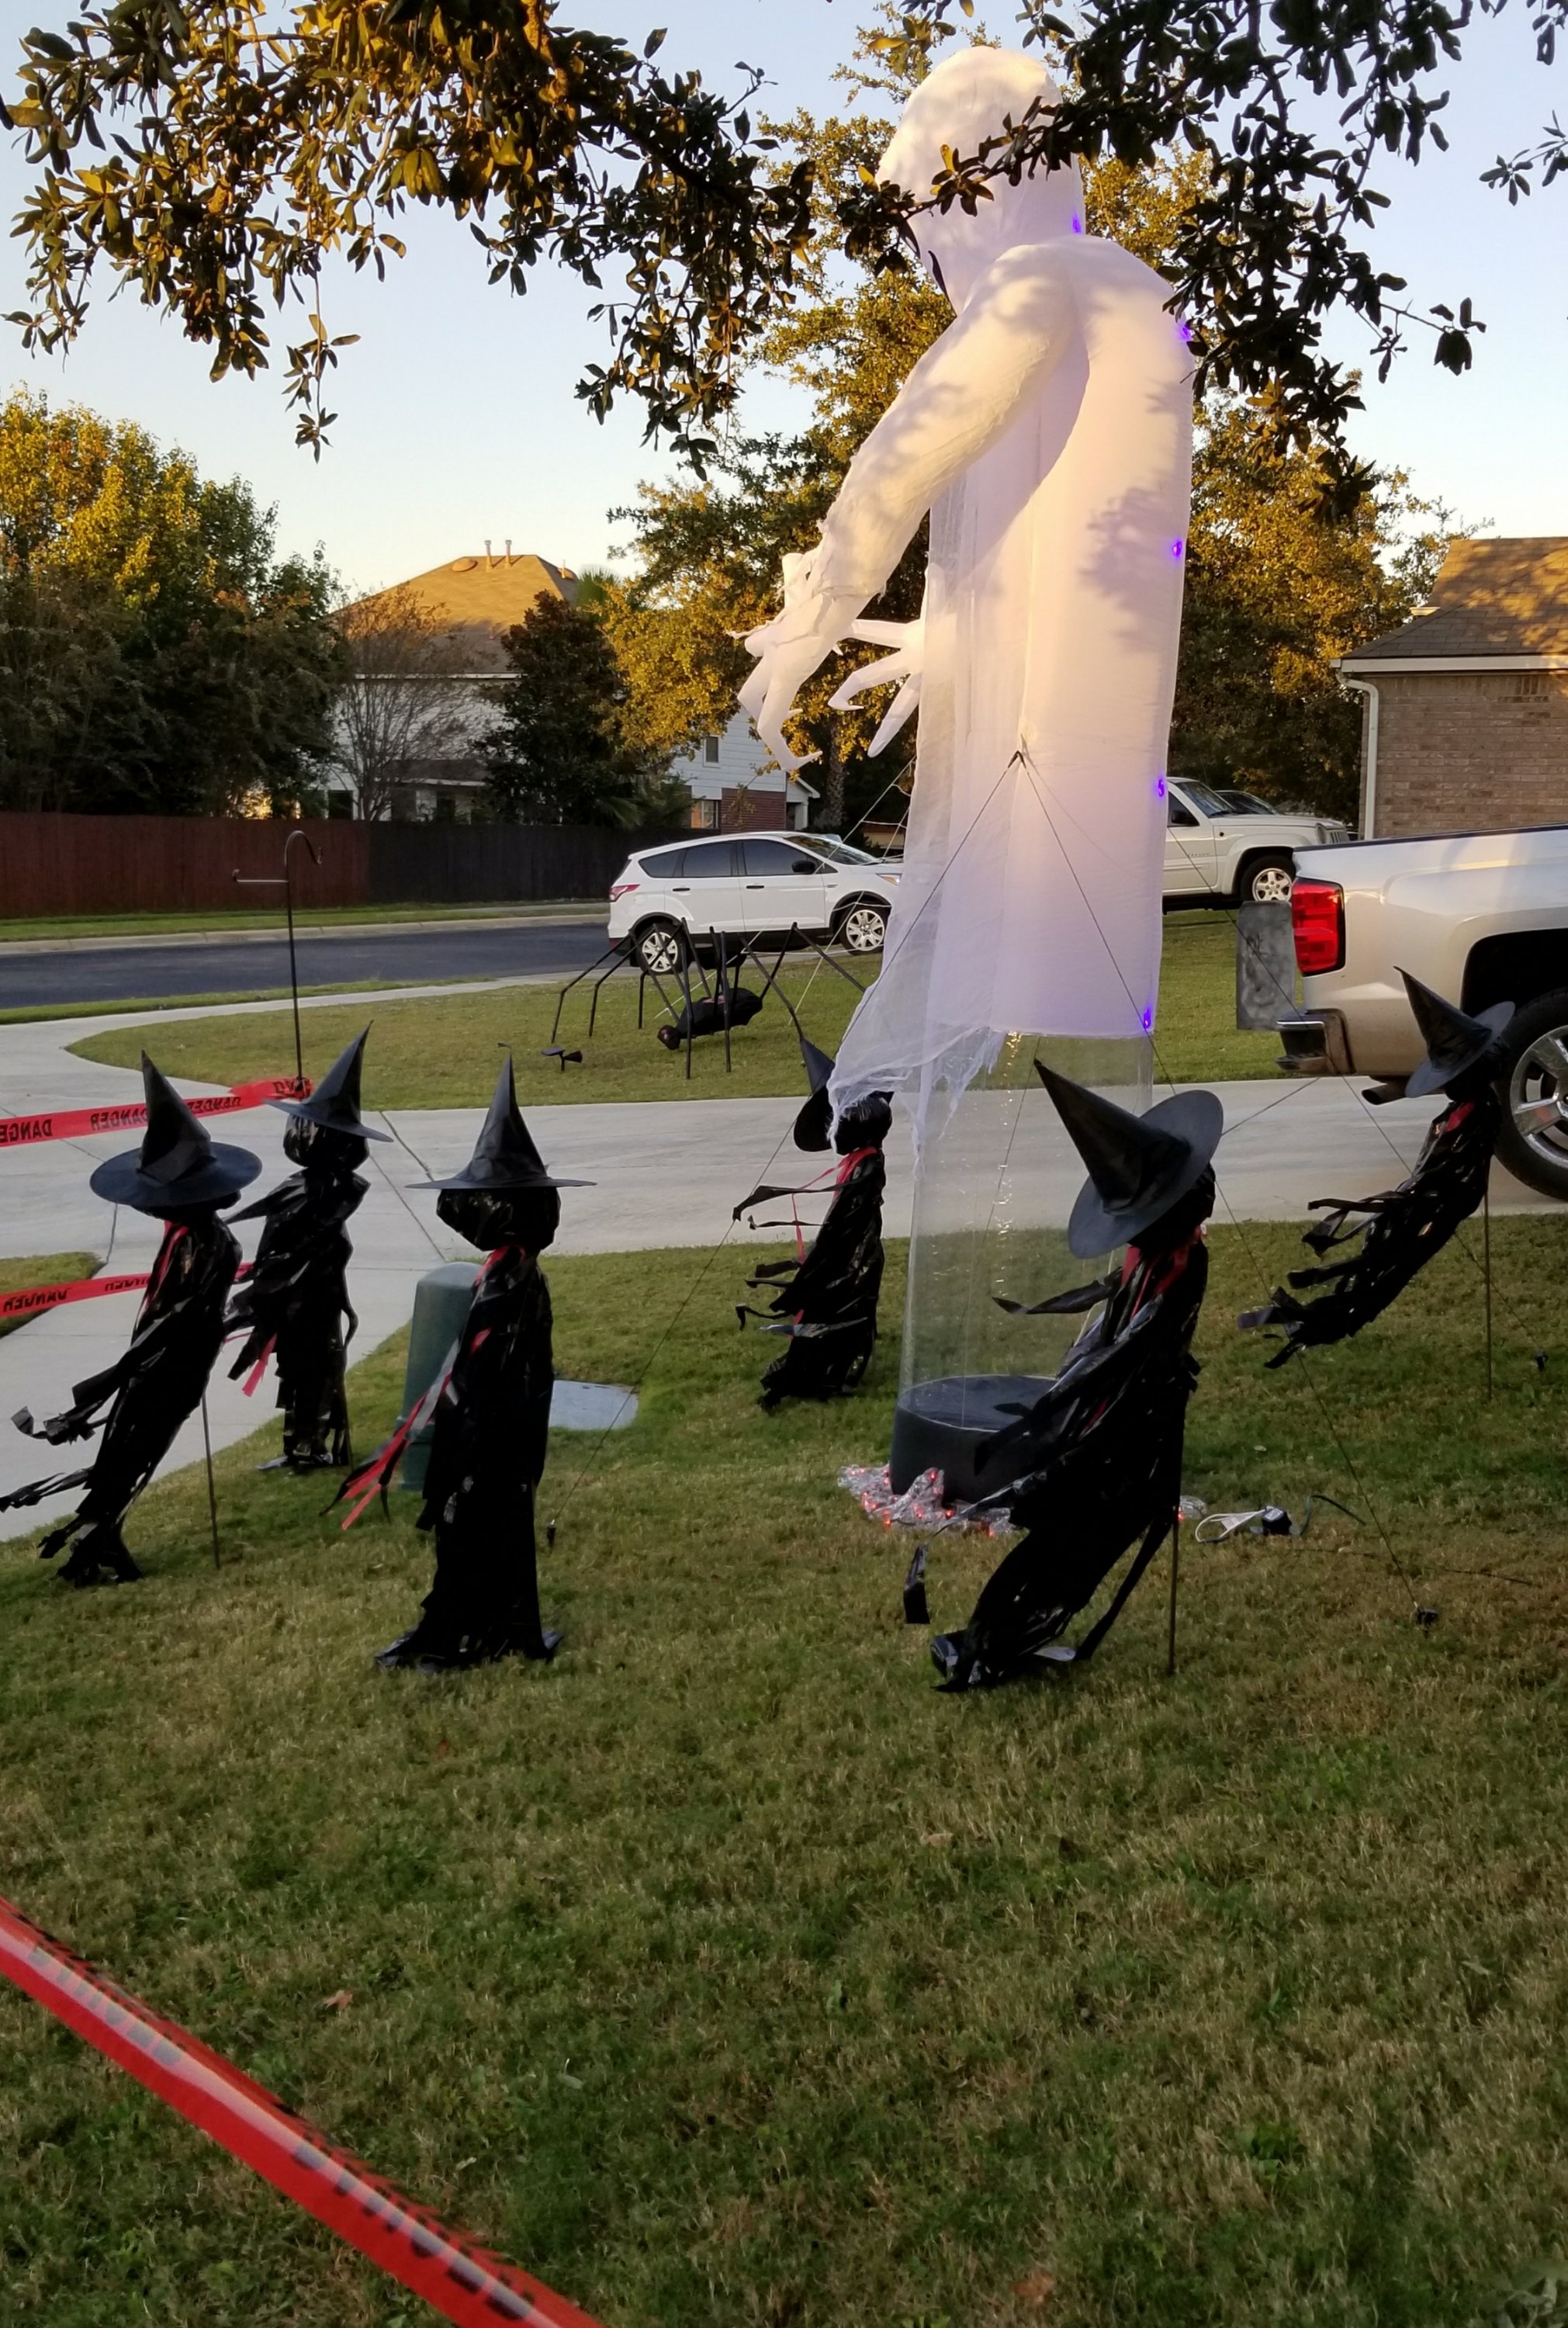
Oh, I had fun making this! She’s now three years old. It has been one of my favorite projects. I have a huge display this year and she still holds her own, even with our 12 foot ghost and witch circle (you can get those instructions here)!

I saw this “packing tape ghost” idea in a pin, but the instructions given seemed nearly impossible. The instructions I saw wrapped the ghost with packing tape sticky side out and then went back and re-wrapped it sticky side in. I knew from the get-go I was NOT going to attempt this with these directions! I have to thank Pintrest for the idea, if not the instructions.
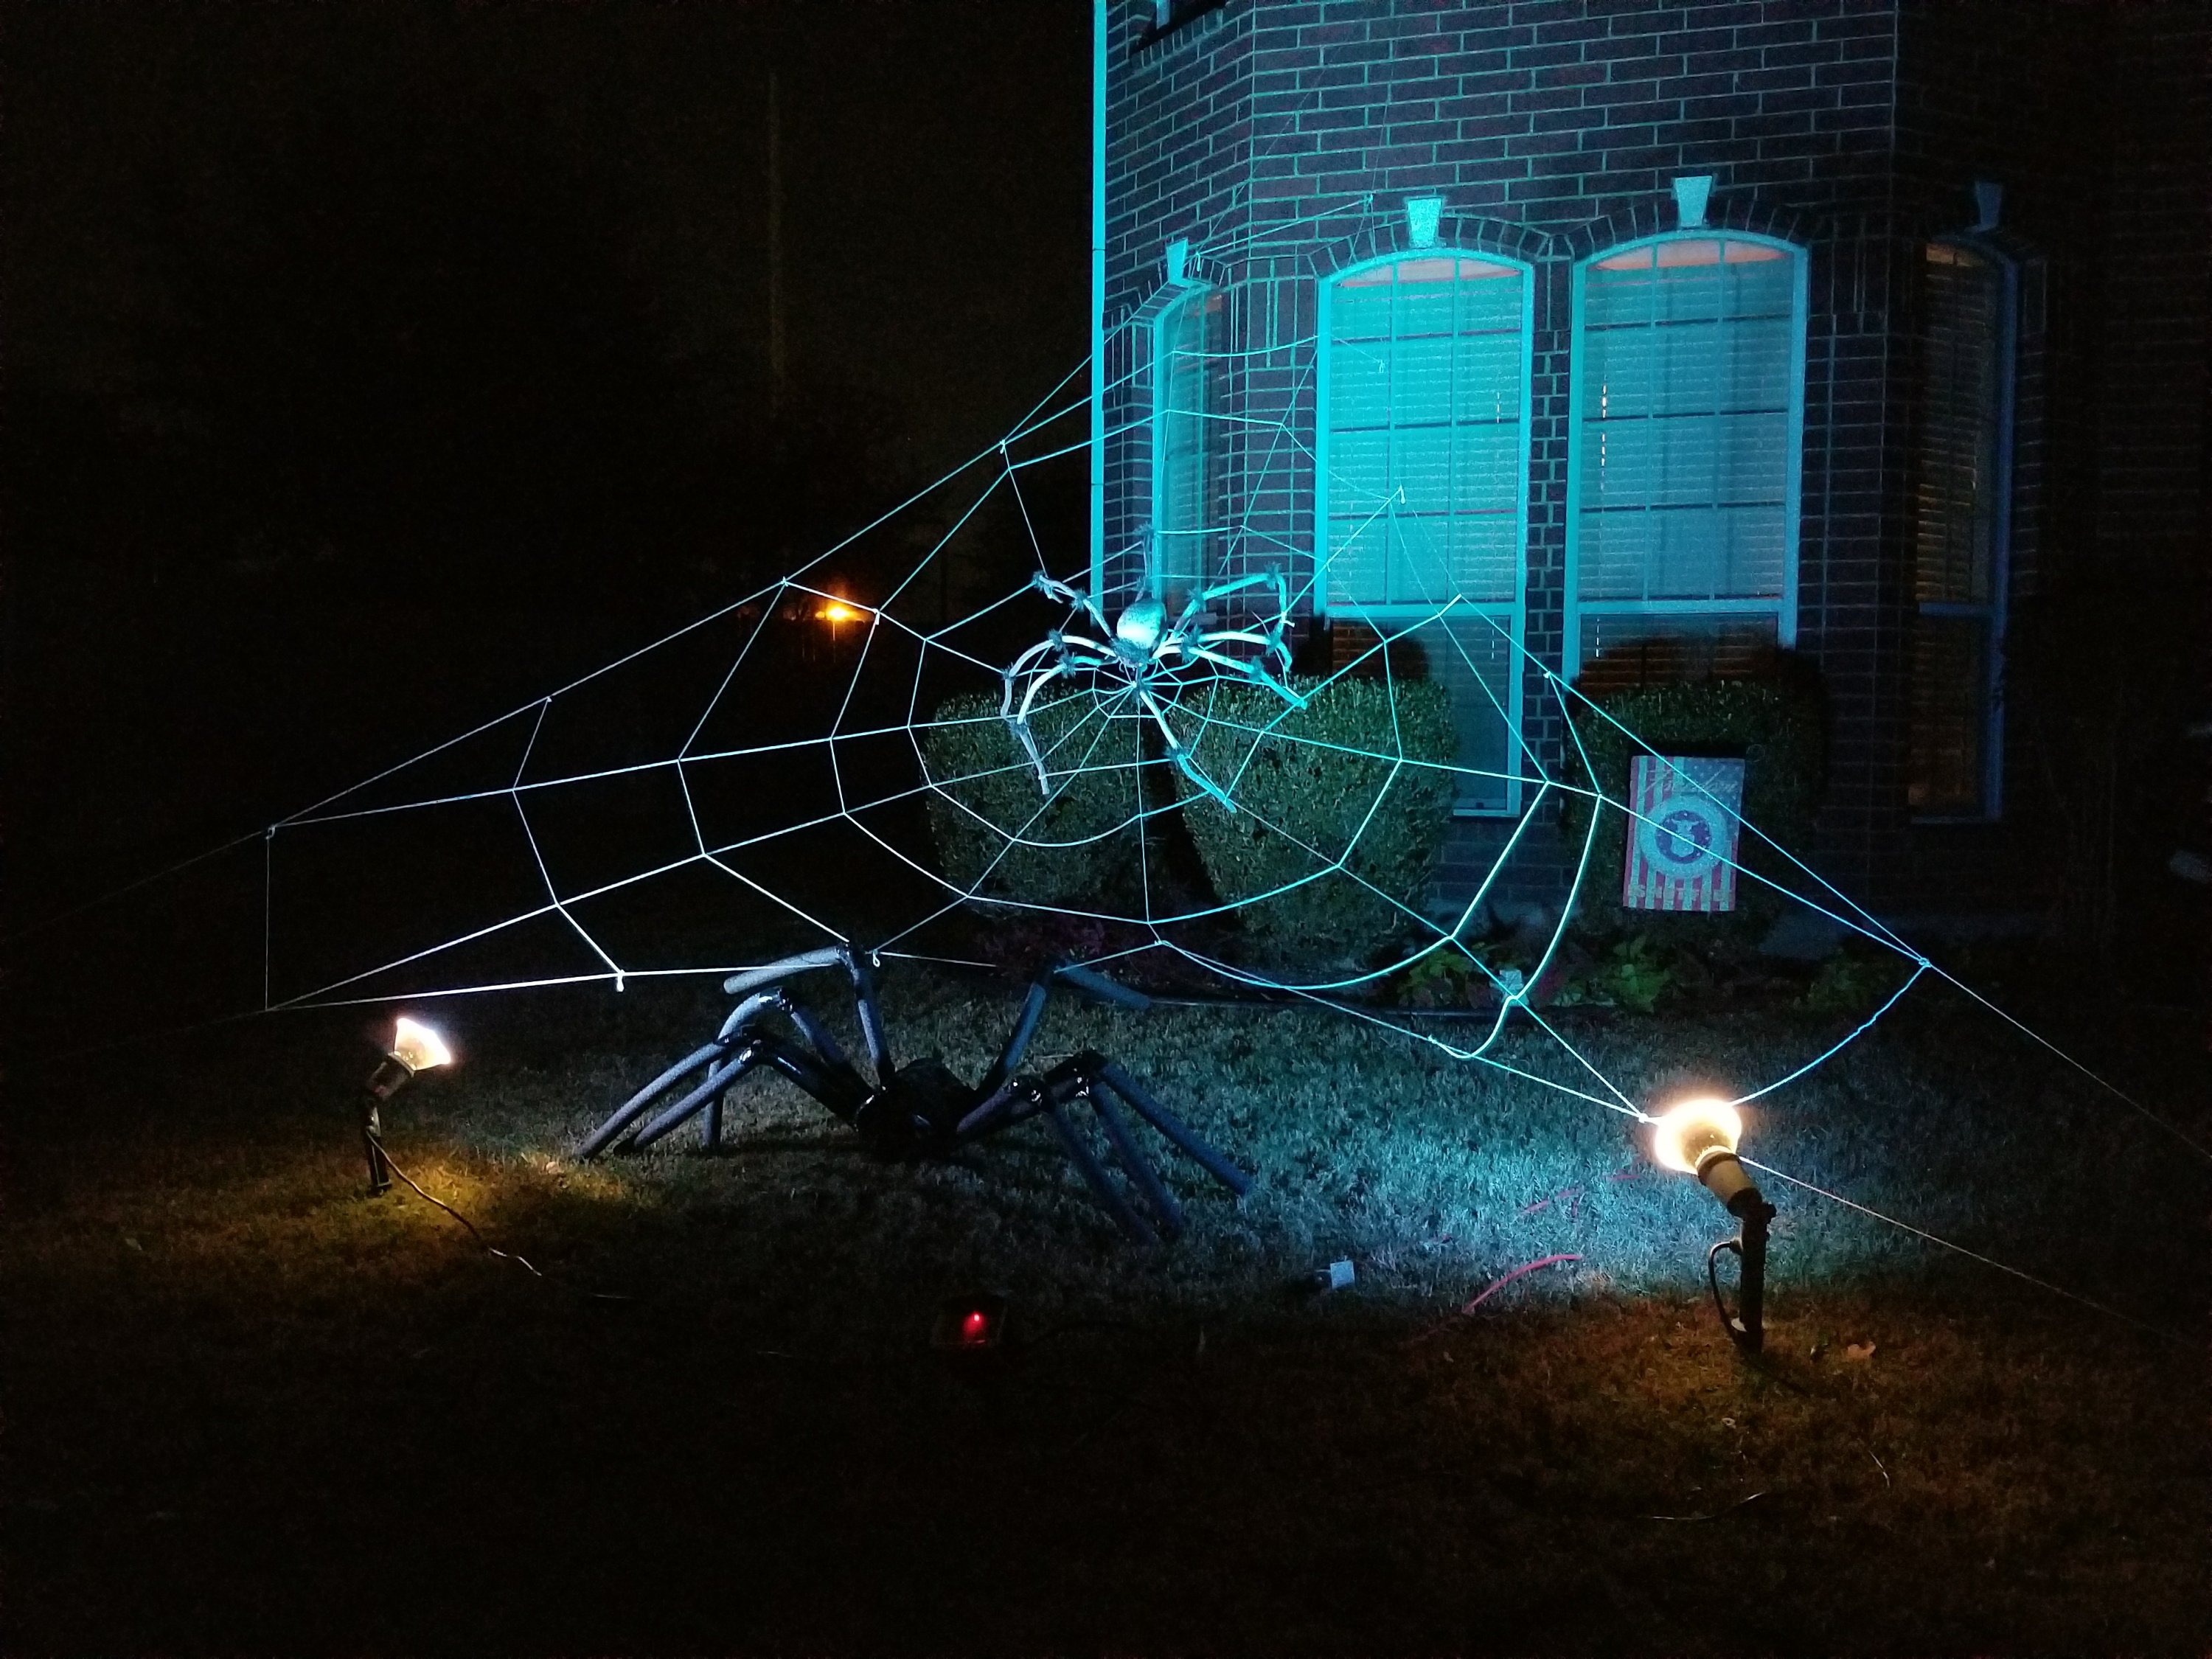
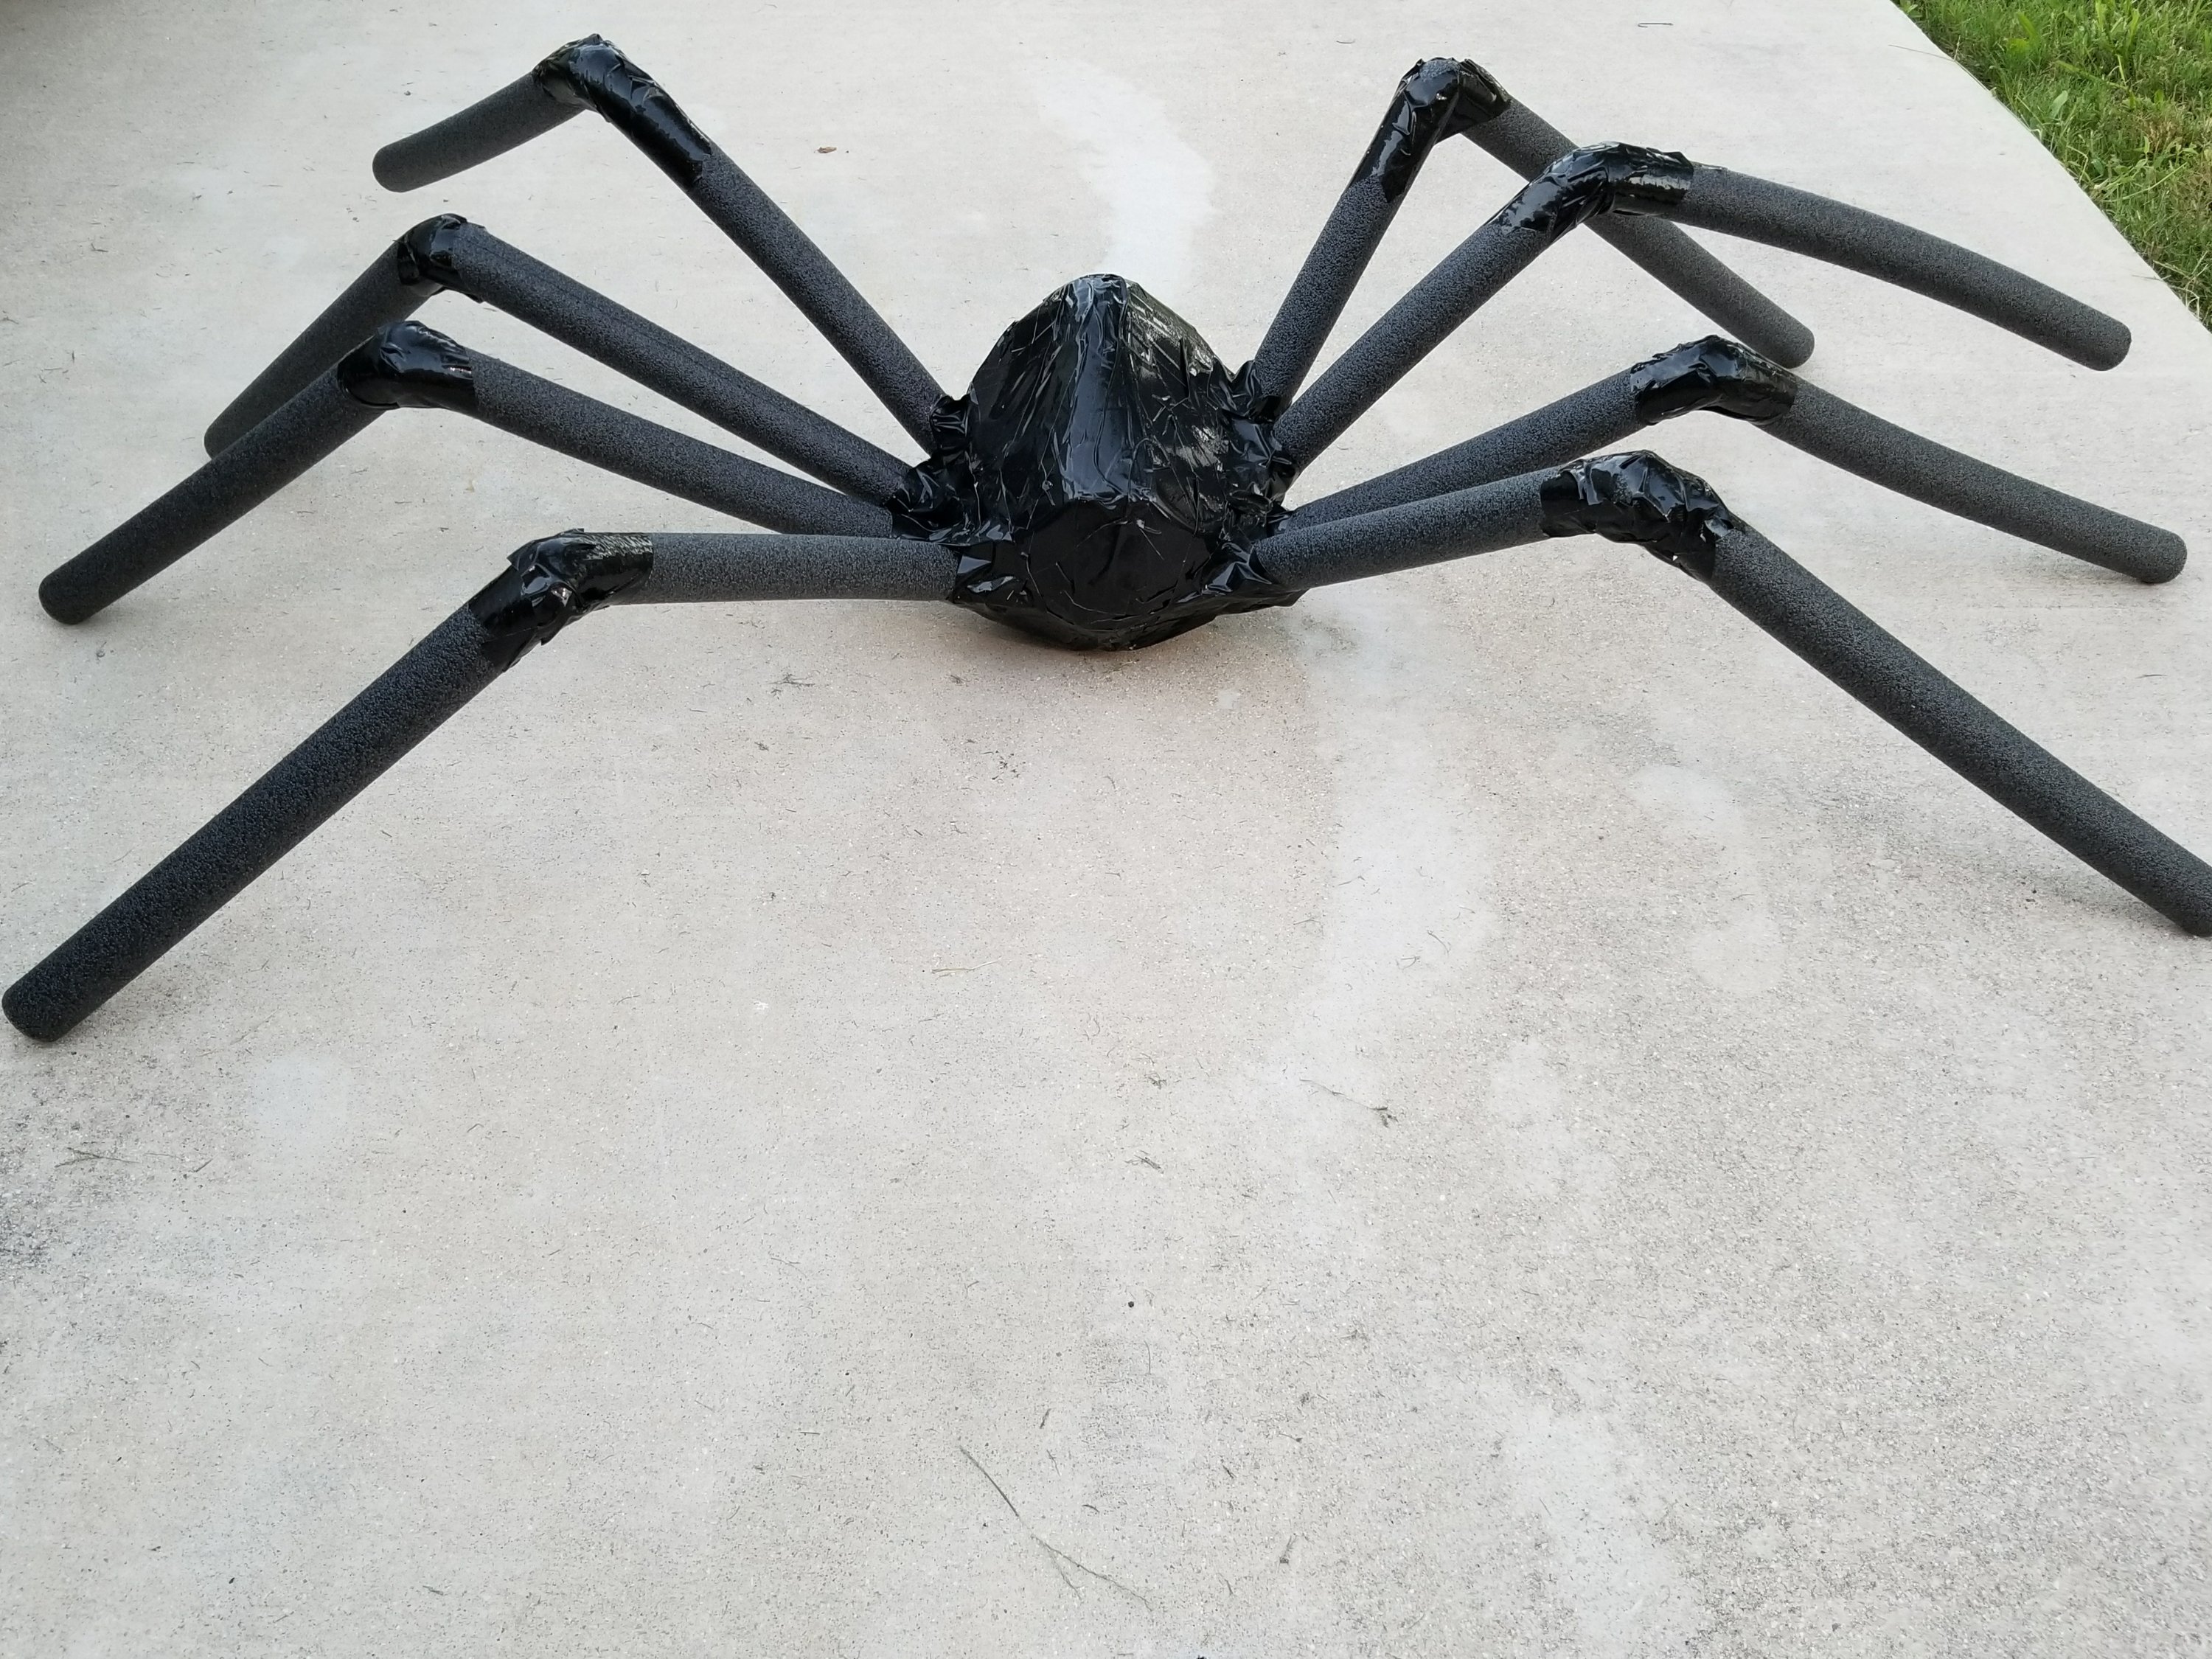
This is the sort of thing I see a photo of, and then skip whatever instructions there are and wing it myself. I made a 30 foot spiderweb this way…but I won’t give you instructions for that. My spiderweb was purely a project to do by sight and it took me several hours to complete. My instructions for my spiderweb would basically be: look at this and then recreate it out of string. Lame instructions indeed! This ghost however, I can easily help you recreate!
I have moved enough to intimately know the limitations of packing tape and I could not see a way to follow the pin’s instructions without pulling all of my hair out in frustration…so I came up with my own way! Here are super simple instructions for a packing tape ghost:

First you are going to need a form. I contemplated having my husband tape me, but figured I might not enjoy the process. I was right: DO NOT USE A LIVE PERSON FOR THIS! It takes hours to finish this and plastic wrap and tape do not breathe. If you tried to use a person 1. they would forever hate you for making them stand still this long and 2. they would pass out from the accumulated body heat. You do not want to be calling 911 when you have made your live “dummy” sick with this project!
I didn’t have a form. I thought I might stuff a dress with newspaper and tape that. I am glad I didn’t. You could try that but it would come out lumpy and dorky and not especially cool. I decided to go down to my local craft store and see if there was anything cheap I could use. If you have a dress form- use it! If you are like me and don’t want to shell out a couple hundred dollars for a real adjustable dress form there are alternatives.


There are plastic dress forms on hangers (they are cheap!) used for store displays sold online. The limiting factor to this is super high shipping and for me: I came up with this idea too close to Halloween to wait for something to come in the mail (I got the idea for this two days before Halloween.) If you live in a large city you may be able to find a local supplier that sells forms to clothing stores. Look up mannequins. I couldn’t find anything close by, so, that was out too. I decided in a last attempt (I was completely ready for this to be a “next year” project) to go down to our local Hobby Lobby…Success! Hobby Lobby had decorative dress forms for sale and I had a 50% off coupon. Hobby Lobby has an app and you can just show them the online coupon and they will take it…so don’t buy anything you don’t have a good coupon for!
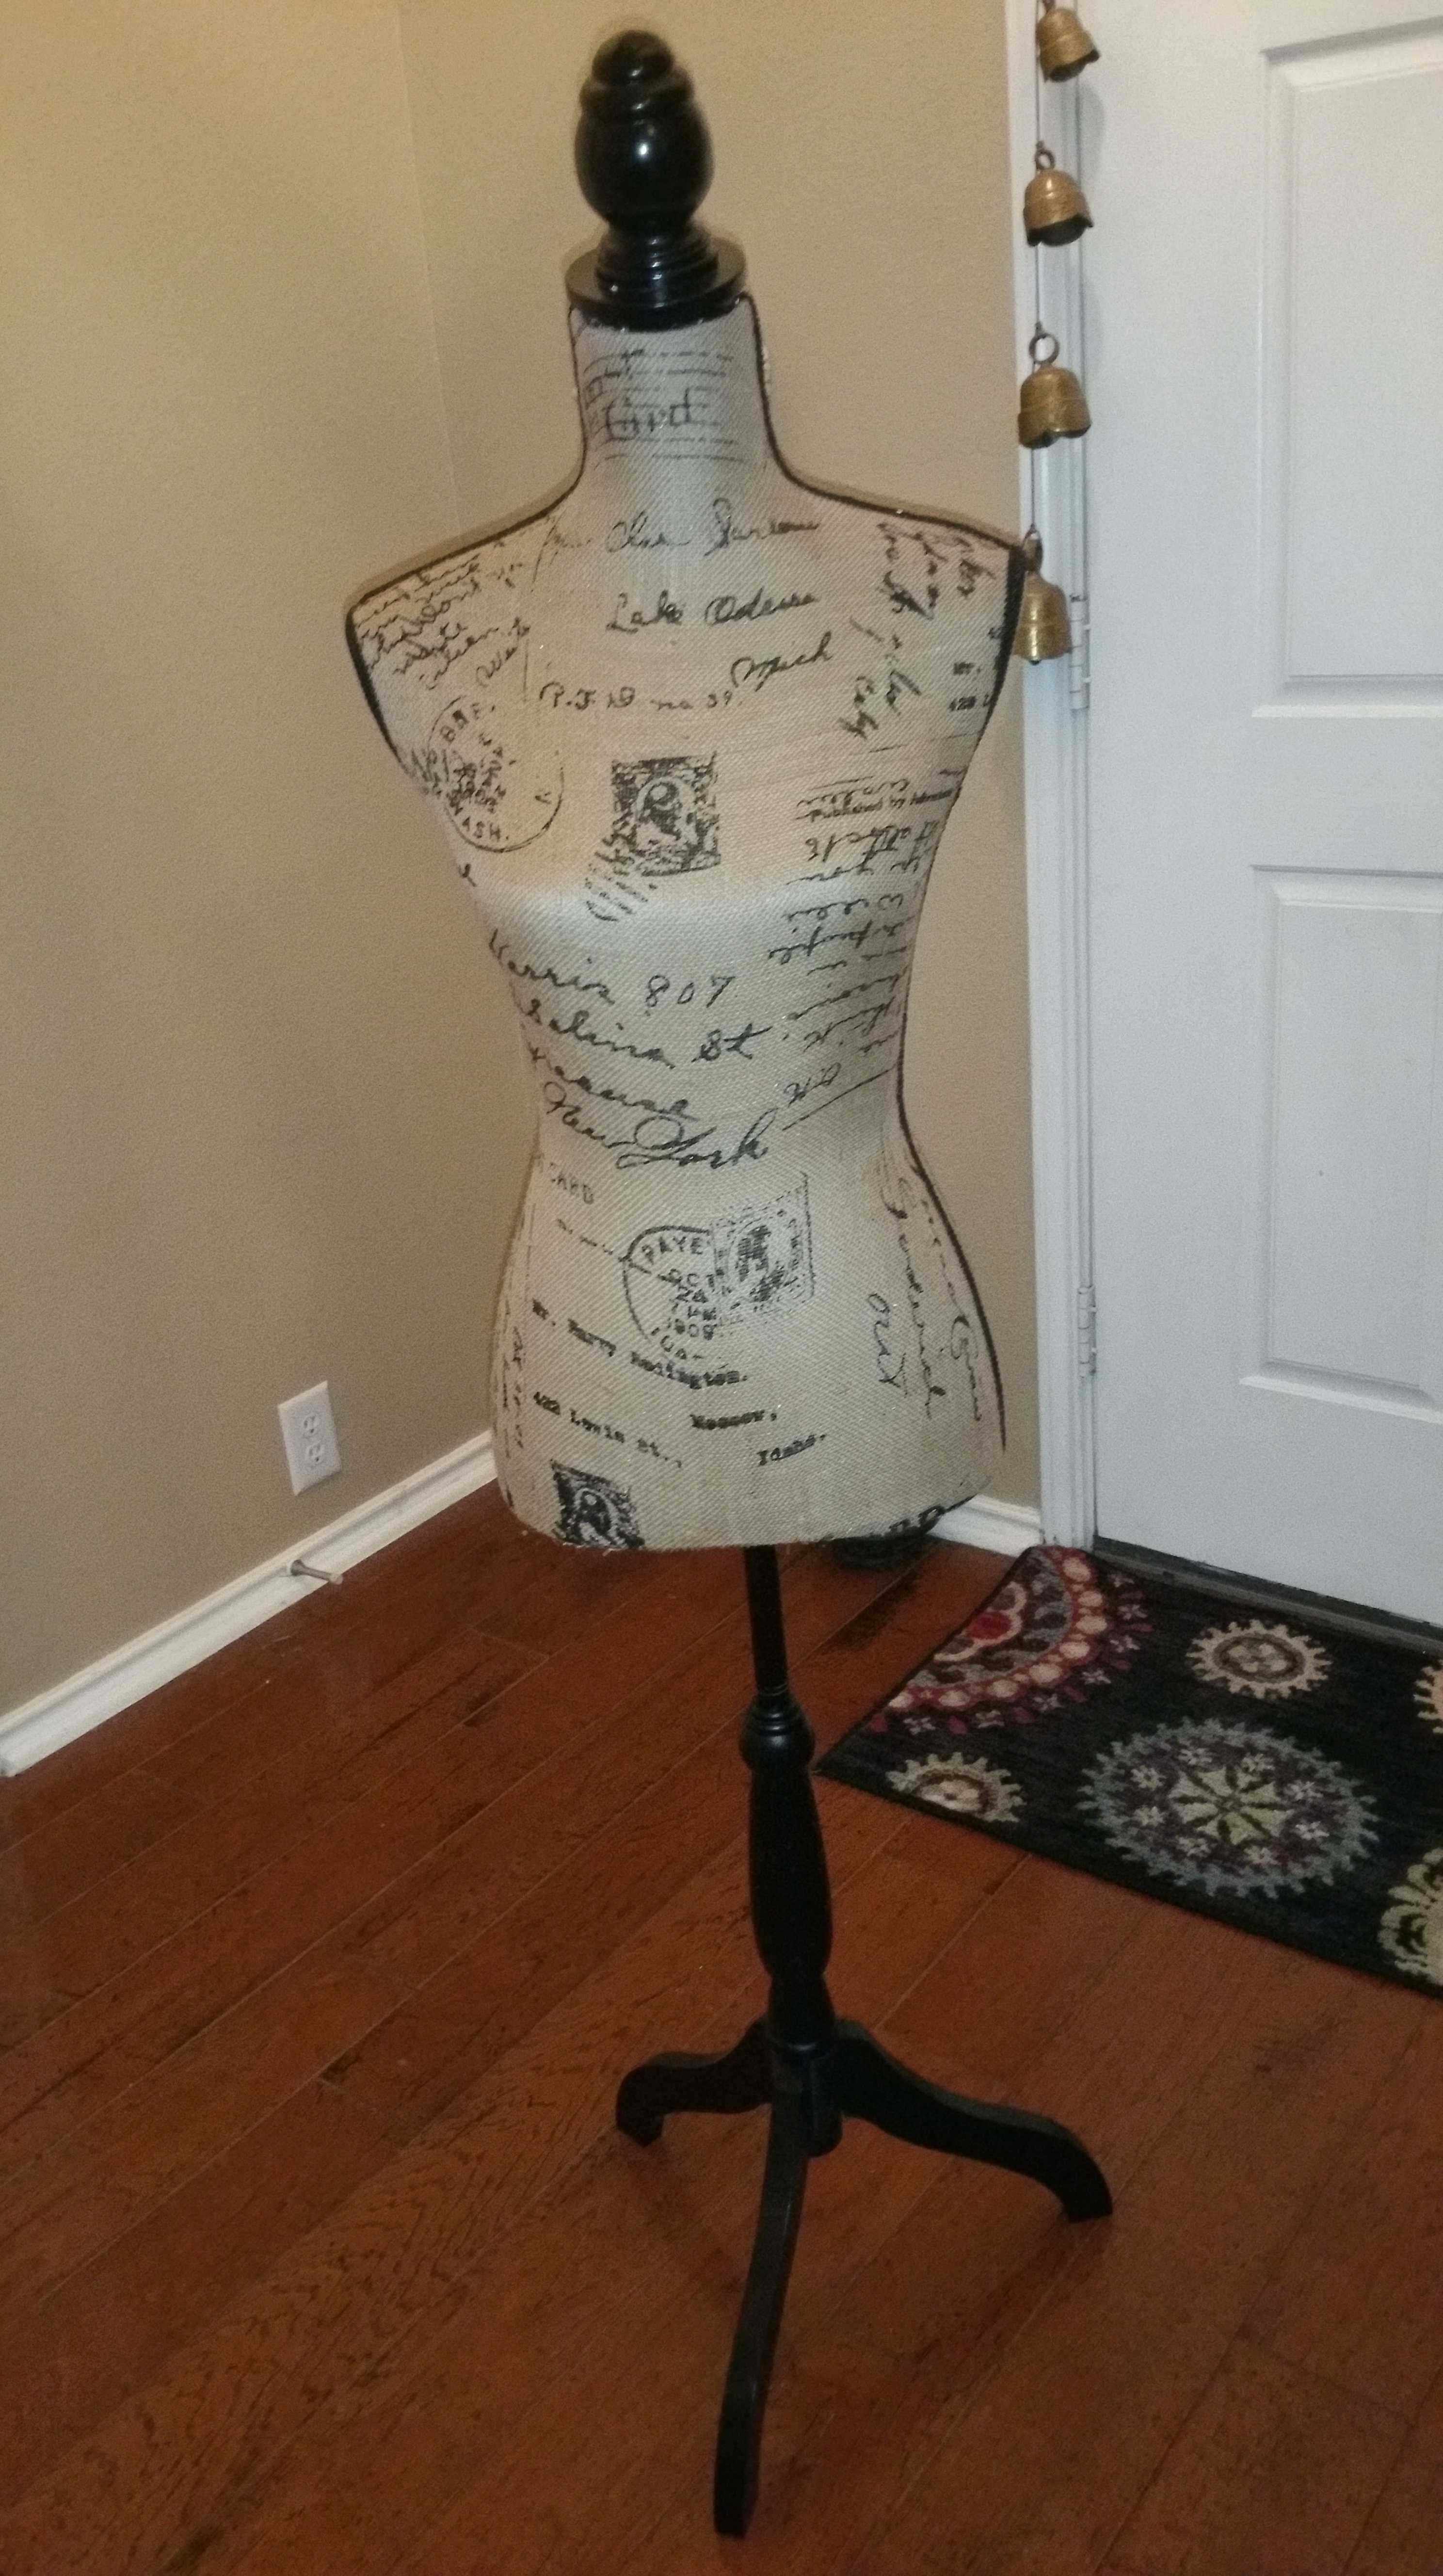
Like a lot of things in Hobby Lobby: most of the dress forms were broken. We had to find some up on shelves. So if you are going to try this and want to buy the dress form: make sure what you are getting is solid, if it isn’t make sure you talk to the manager and get a discount. (Hobby Lobby will give you incredible deals on things that are slightly damaged. Our local Micheal’s craft store does not have these. I did not try JoAnn’s fabric.) I would guess that this type of mannequin is sold in many different hobby/craft/fabric stores, you are just going to have to look around.
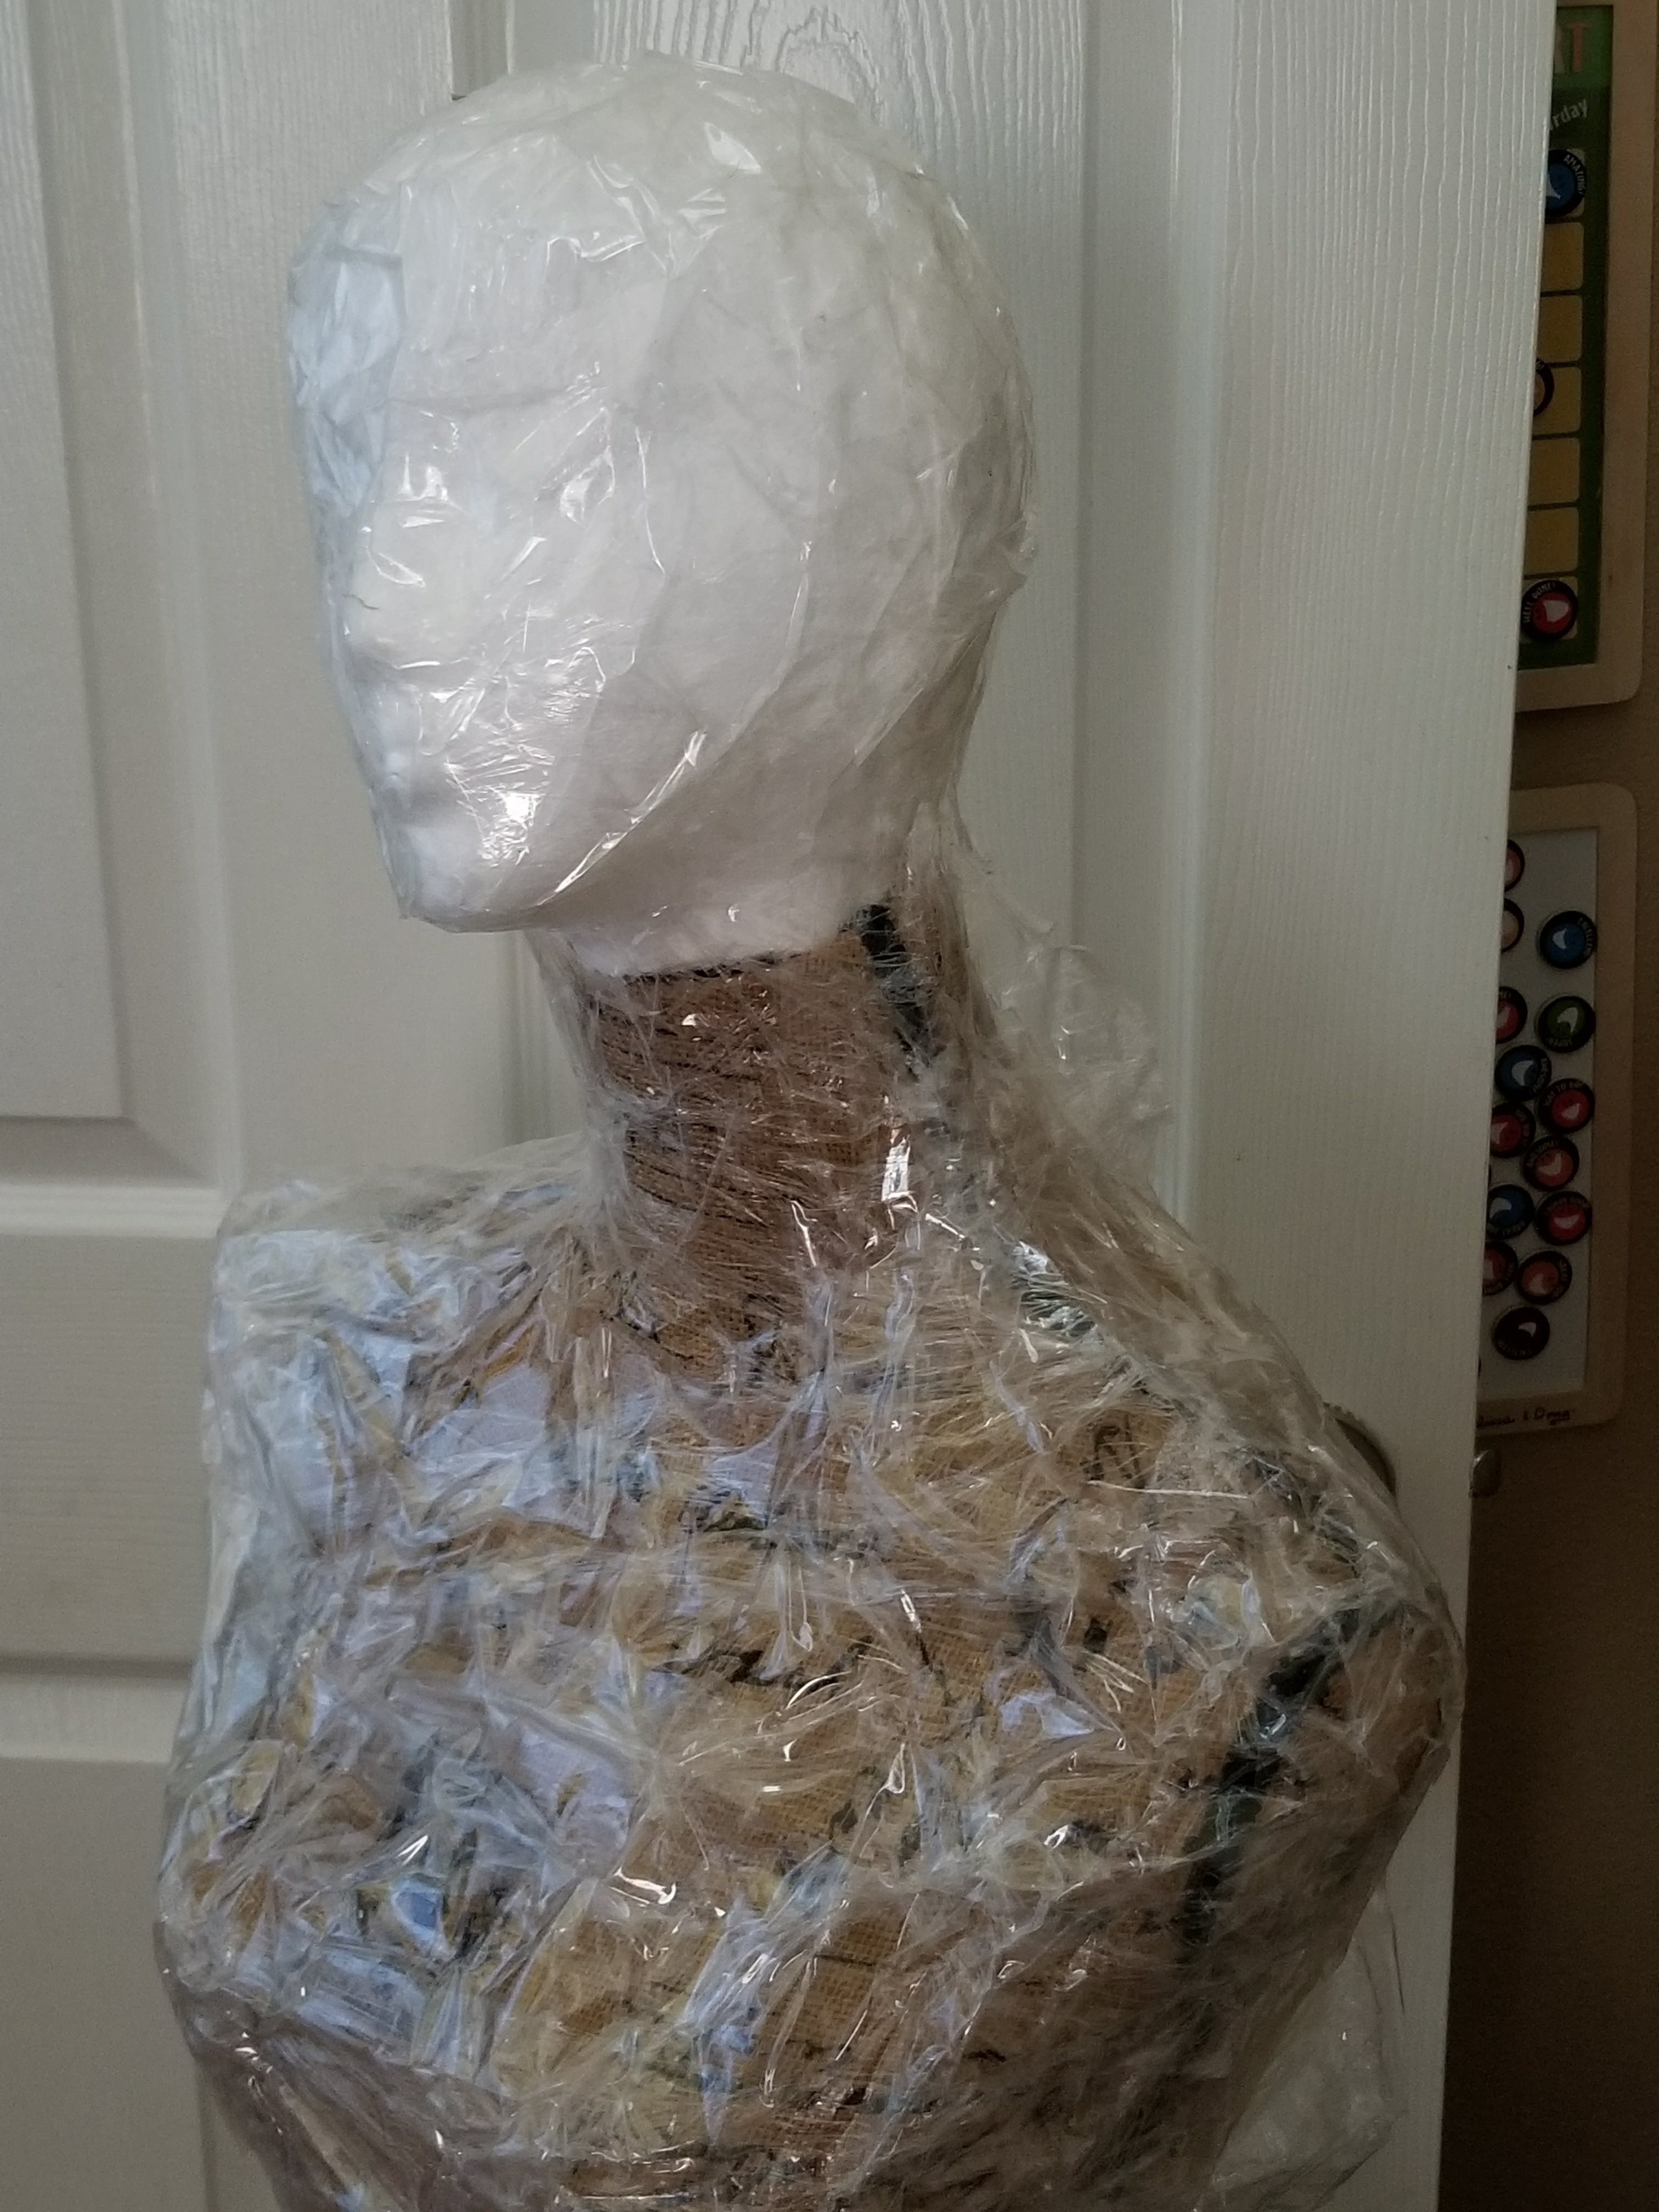
Second you need a Styrofoam head or a large detached doll head. I had to pass on a baby doll I borrowed from our neighbor. The hair was in the way and would have made cutting the form off the doll difficult (did I mention I made a ghost baby, too? I used a bald baby doll. This has a lot of applications!) I got my Styrofoam head at Hobby Lobby, as well. There is a section just for Styrofoam in the back of the store (not with the floral foam.) I cut part of the neck off so the head sat correctly on the body.


So, now that you have the two basic pieces for the ghost, (the head and body) you can get the rest of your supplies:
Clear plastic packing tape (I used two jumbo rolls and used 2/3 of it)
Plastic wrap (You don’t need premium plastic wrap but make sure it will actually stick to itself.)
Support for your ghost (read below)
A bright black light to light the ghost (make sure the bulb and housing are made for outdoor use.)
Optional:
A tape gun (I wouldn’t do this project without one, but you can try.)
Scissors for any excess you decide to remove as you are going.
A queen sized sheet (If you want to make a dress shape for the ghost.)
Something large to support the skirt of the dress shape (I used a large bag of paper we had to shred and balled up newspaper. I also used newspaper to make a bustle for the back of the skirt.)
Pins to hold the skirt of the dress to the form.
Now it’s time to make the ghost!
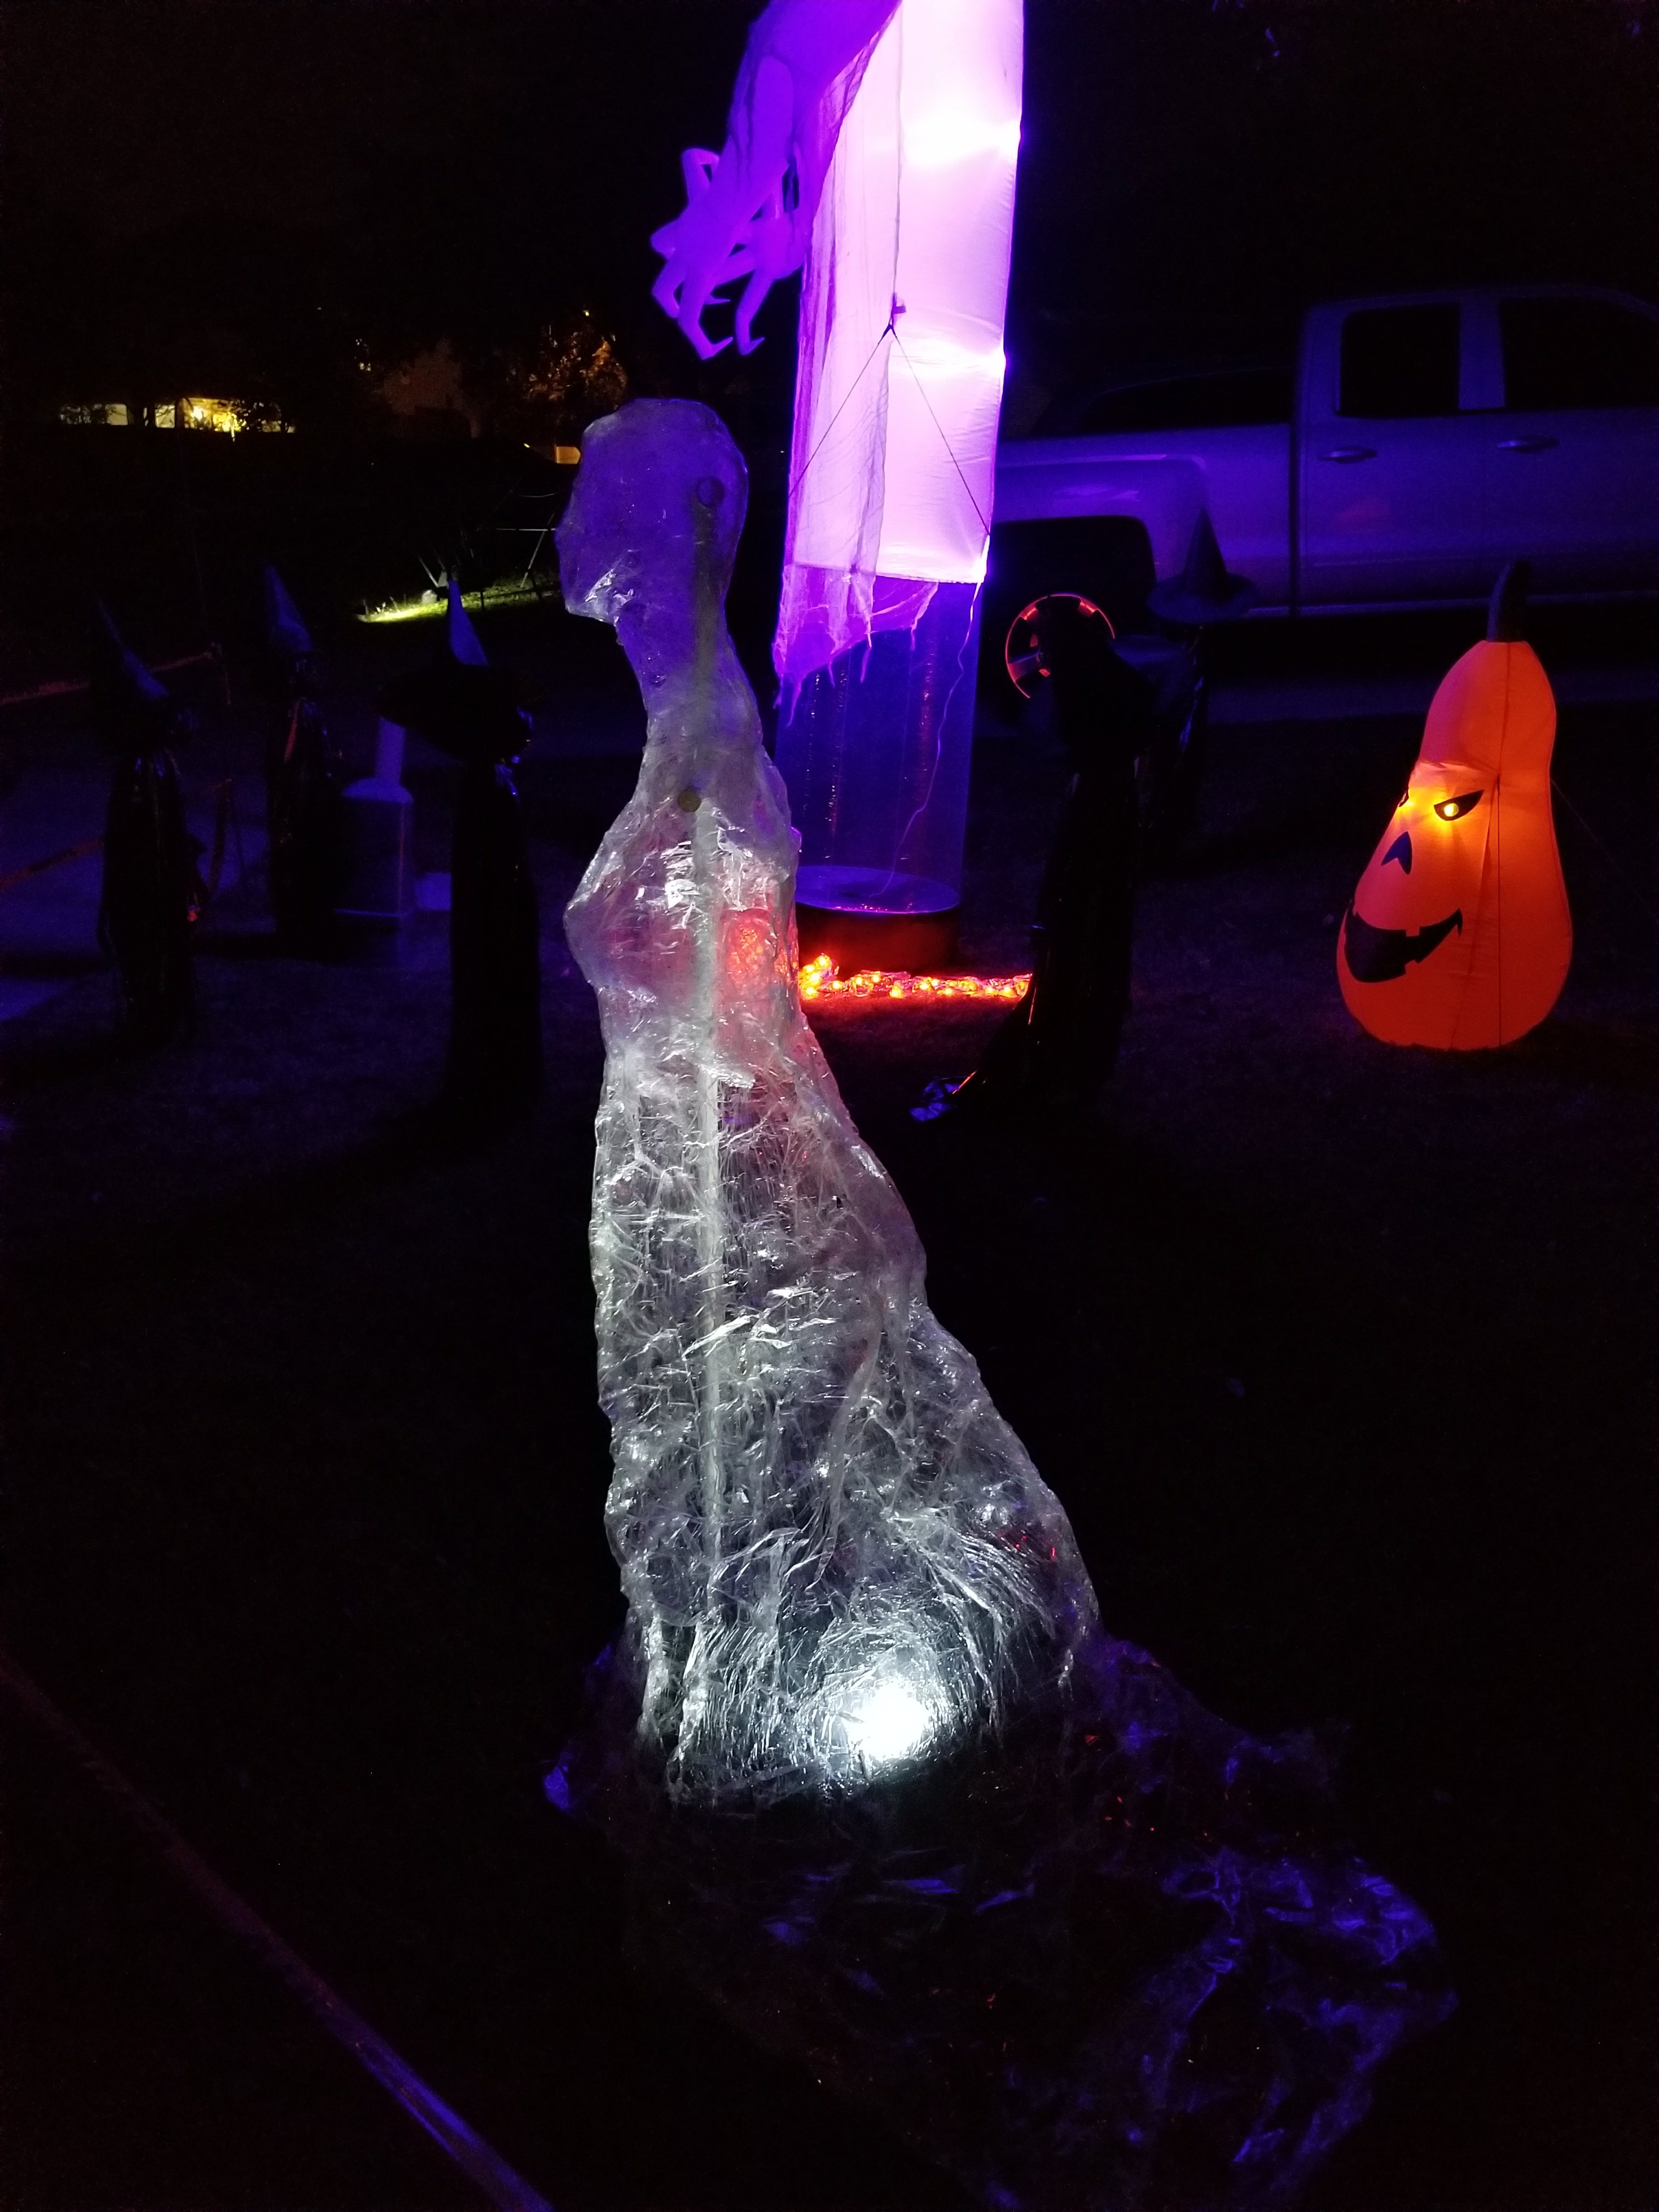
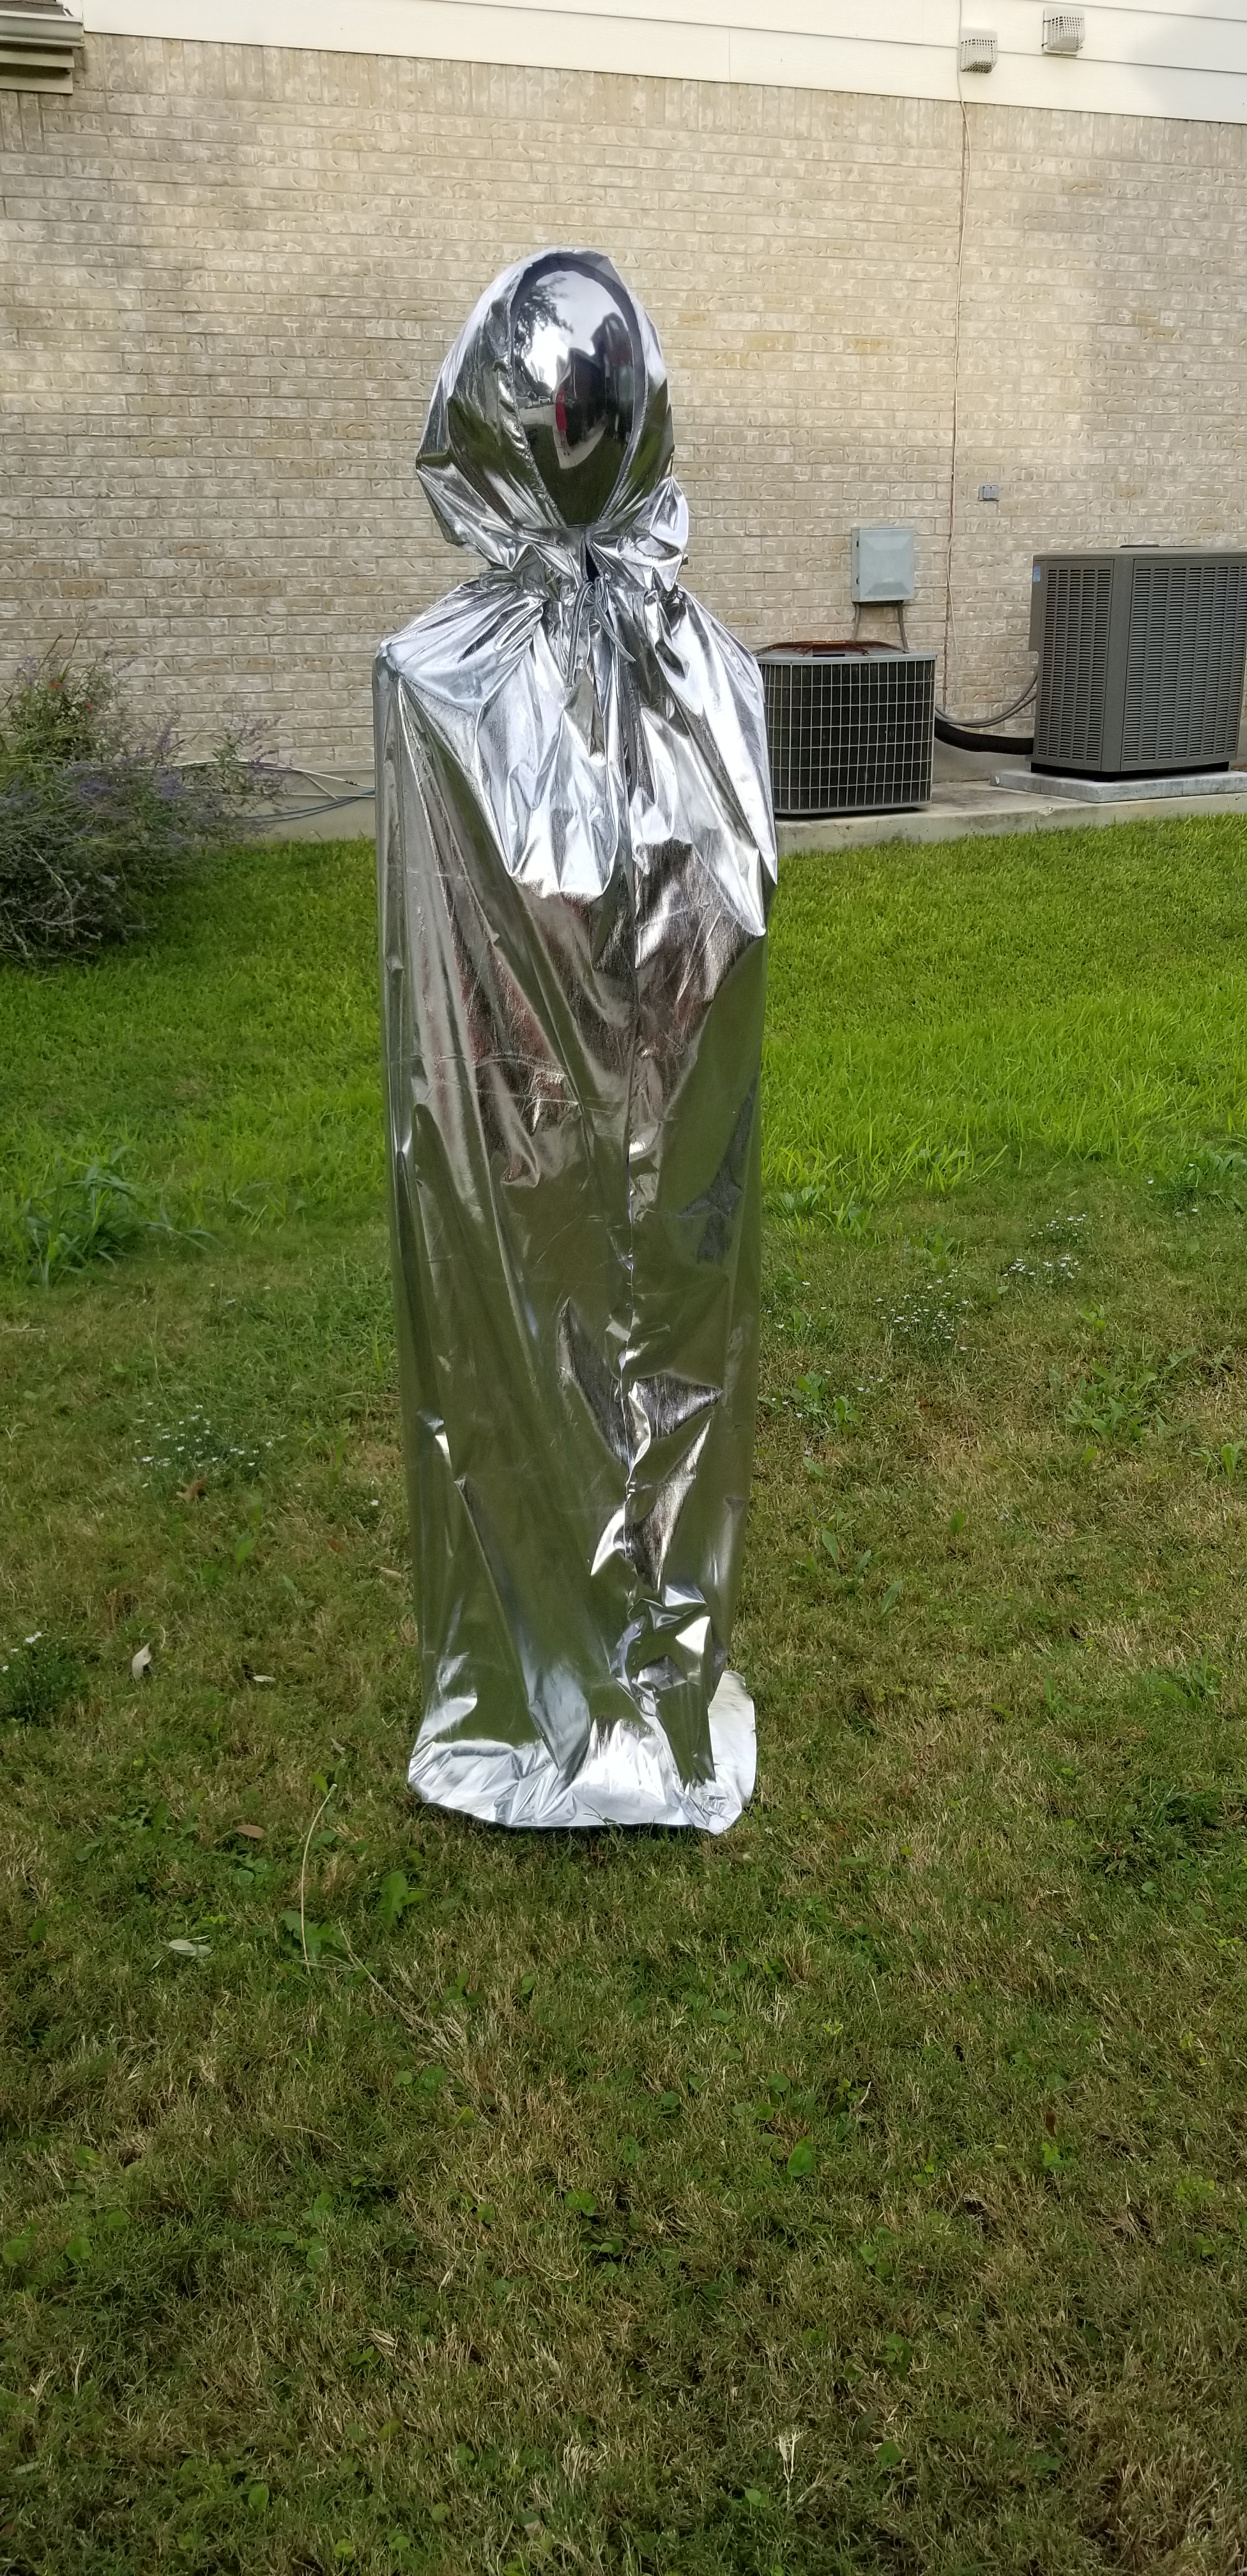
Tape the head to the form. Wrap the entire thing in plastic wrap, including the skirt. The more wrinkles in the plastic wrap: the better this ghost turns out. The wrinkles will catch the light. Feel free to be messy! You don’t want more than one pass with the plastic wrap because the tape needs to be in contact with the plastic wrap to keep it in place. So, try to keep your plastic wrap layer thin. (Although you will end up with a few extra layers as you go. You can use the scissors to cut back any layers you feel might be too much, although this is completely optional.)

Once you have the plastic wrap done start taping the ghost. Hold down any plastic wrap sections on the face and neck as you tape to create detail. You can also cut small sections of tape to fit areas that need more detail than a long strip will give you…and yes, the details show in the end product. You need two layers of tape. This part of the project took a couple of hours (even though this is a simple project it takes a good chunk of time.)

Now that you have completely covered your form (twice) with tape it is time to cut the layers off of the form. This is why plastic wrap is superior: you don’t want the tape to be stuck to your form and it makes this a semi-easy, doable project!

Once you have cut the tape off of the form and removed it from the mannequin you created (with the dress form and head) you need to tape it back together. When you cut this off I suggest looking for the fastest route across the taped area that does not cut the face of the ghost. Sit down, align the areas that need taping and slowly (and carefully) tape your ghost back together. The two layers of tape will give the form enough strength to keep its shape.

You need something inside the ghost to keep it upright. I suggest buying a piece of rebar, drive it into the ground and slide a taller piece of pvc pipe on it (I think plain rebar would poke through the tape.) Put your ghost over it (making sure the pvc has been cut to rest in the top of the ghost’s head. We finished the support this year. She looks great!)

To secure it: I suggest getting some landscape pins from a home and garden store. You don’t want this to fall or blow away. We had no time to work on her support the first year so my husband just took the ghost and put her on a large floor lamp with the shade removed. It wasn’t quite tall enough so the skirt buckled (not permanently, but she looks so much more impressive set up at the right height.) More importantly: ours blew over! We got home to find the tape had touched the light we had aimed at her…and it was smoking. We were very lucky the ghost didn’t catch fire in the front yard! We bought a battery powered strobe light this year. It fits inside the skirt and doesn’t get hot!
Another idea (that would cost more but be fun) is to create a wooden hangman’s support to hang her from. You would still need to tie her down though, because she doesn’t show up with out a lighting source and would need some stability to keep her from flying all over…this is on my “to do list” for next year!
(We live in South Texas. Everyone does Halloween in a big way down here! You should see some of the cool stuff around our town! Some people spend thousands on their front lawn. My display is probably the best for the money. I make all of the “big” stuff that we have. I guess I grew up too long ago to believe in spending much money on Halloween!)
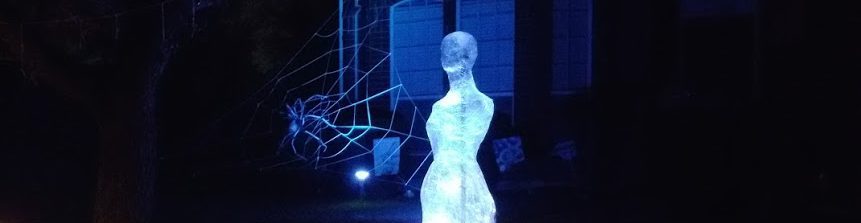
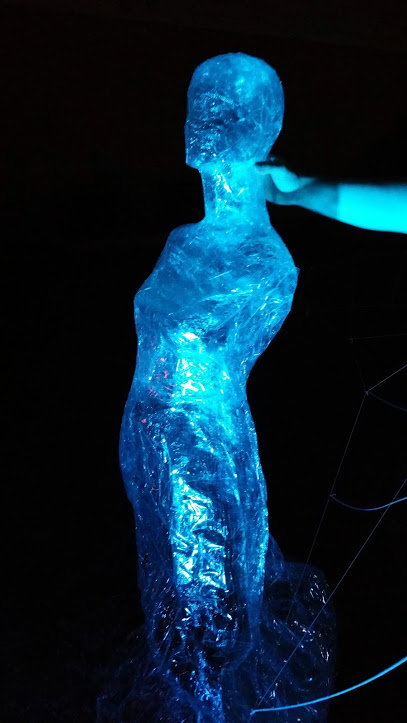
To light your ghost you need either a black light flood light or a plug in colored or white outdoor bulb and housing. We used a blue bulb the first two years and then switched to a battery powered, safer strobe light. The battery powered light does not get hot, but I liked the blue light better. However, it is tricky to find a black light rated for outdoor use. This is ideal: Outdoor Plug In Color Changing (Blue) Lightbulb In An Outdoor LightHousing.You can try other kinds but we have found the incandescent ones work much better than newer types of bulbs. The drawback to incandescent bulbs is that they get hot and the tape cannot be: on, over or very near, the light bulb. Just try and be aware of this when you light the ghost. This ghost is almost a neon sign in your yard. People can see this from down the block and will come to your house just to see the packing tape ghost. It turned out to be just as impressive as our 30′ spiderweb that I made from string, a year earlier.
Also, expect that some teenage no-goods may find your ghost very attractive and try and bring her home with them. I would not leave the ghost in the yard unattended, as we had a few older kids lurking about on our dark street, late at night, that magically decided to go home after I brought the ghost in.

I also made a ghost baby and intend to make spider egg sacks (with balloons as a base form.) We put the ghost baby in an old stroller and lit it with a flashlight. A stroller, by the way, is a brilliant addition to trick or treating! We had the storage below the stroller for: a garage door opener/keys, water bottles, snacks for the kids, an area for extra candy (bring shopping bags to keep the candy separated), and a place for the costume parts that my kids always shed as we walk around. Go big or go home, right? Anyway, the baby was a fun way to bring a part of our display with us.
I’d love to see your versions and please remember to include where you got your instructions if you share your creation! If you are interested in making any of my projects here the links are below the photos!
The store is now open! Come take a look! https://crazy-green-thumbs.printify.me/products


How To Make A Bagged Dead Body For Halloween


Happy Halloween!
Make a one-time donation
Make a monthly donation
Make a yearly donation
Choose an amount
Or enter a custom amount
Want to help out, but you’re waiting for the perfect moment to shop the store? Buy me a coffee or let me know you love the content! Your donations keep Crazy Green Thumbs running and are much appreciated!
Your contribution is appreciated.
Your contribution is appreciated.
DonateDonate monthlyDonate yearlyDiscover more from Crazy Green Thumbs
Subscribe to get the latest posts sent to your email.

What fun! Well done! 🙂
Thank you! I’m glad you liked it!
This is so cool. Thank you for the info on how the tape can’t get hot. That would be an unpleasant surprise inside the house. Outside sounds good. Good instructions. Now I have a second excuse to get that dress form I’ve been wanting.
Once you have the dress form you can make more every year. I plan on having a whole yard full of ghosts. Since we’re so far south I decided to store her inside the house in our spare room. I think the heat of summer would do a lot of damage to the adhesive and the tape. Farther north: the winters would affect it. It’s been my experience that tape on stored packing boxes loses its integrity over the years. I want to keep this as long as possible! Thanks for coming by! I appreciate the visit!
I knew you were a Texan the second you said you ditched the instructions and went your own way. It didn’t help when you relentlessly hunted down the form 2 days before Halloween. Hobby Lobby is another clue, it’s the holy grail of crafting in Texas. On a side note, your girl is awesome!!! 😀
Hehehe! Yep. I grew up down here but moved away for a few decades. I’m happy to be back. Texas is definitely defined by hobby lobby crafting and a “hold my beer and watch this!” attitude! Thank you for the compliment on the ghost. I appreciate it! I got a good giggle from your comment!
Hi. I love this ghost idea and I’m going to give it try this year. A suggestion for keeping the tape and plastic away from the light is to put chicken wire or something around the light to keep it from melting your creations.
Great job and love your directions! I definitely agree that the plastic wrap is an awesome idea!!! Happy almost Halloween!
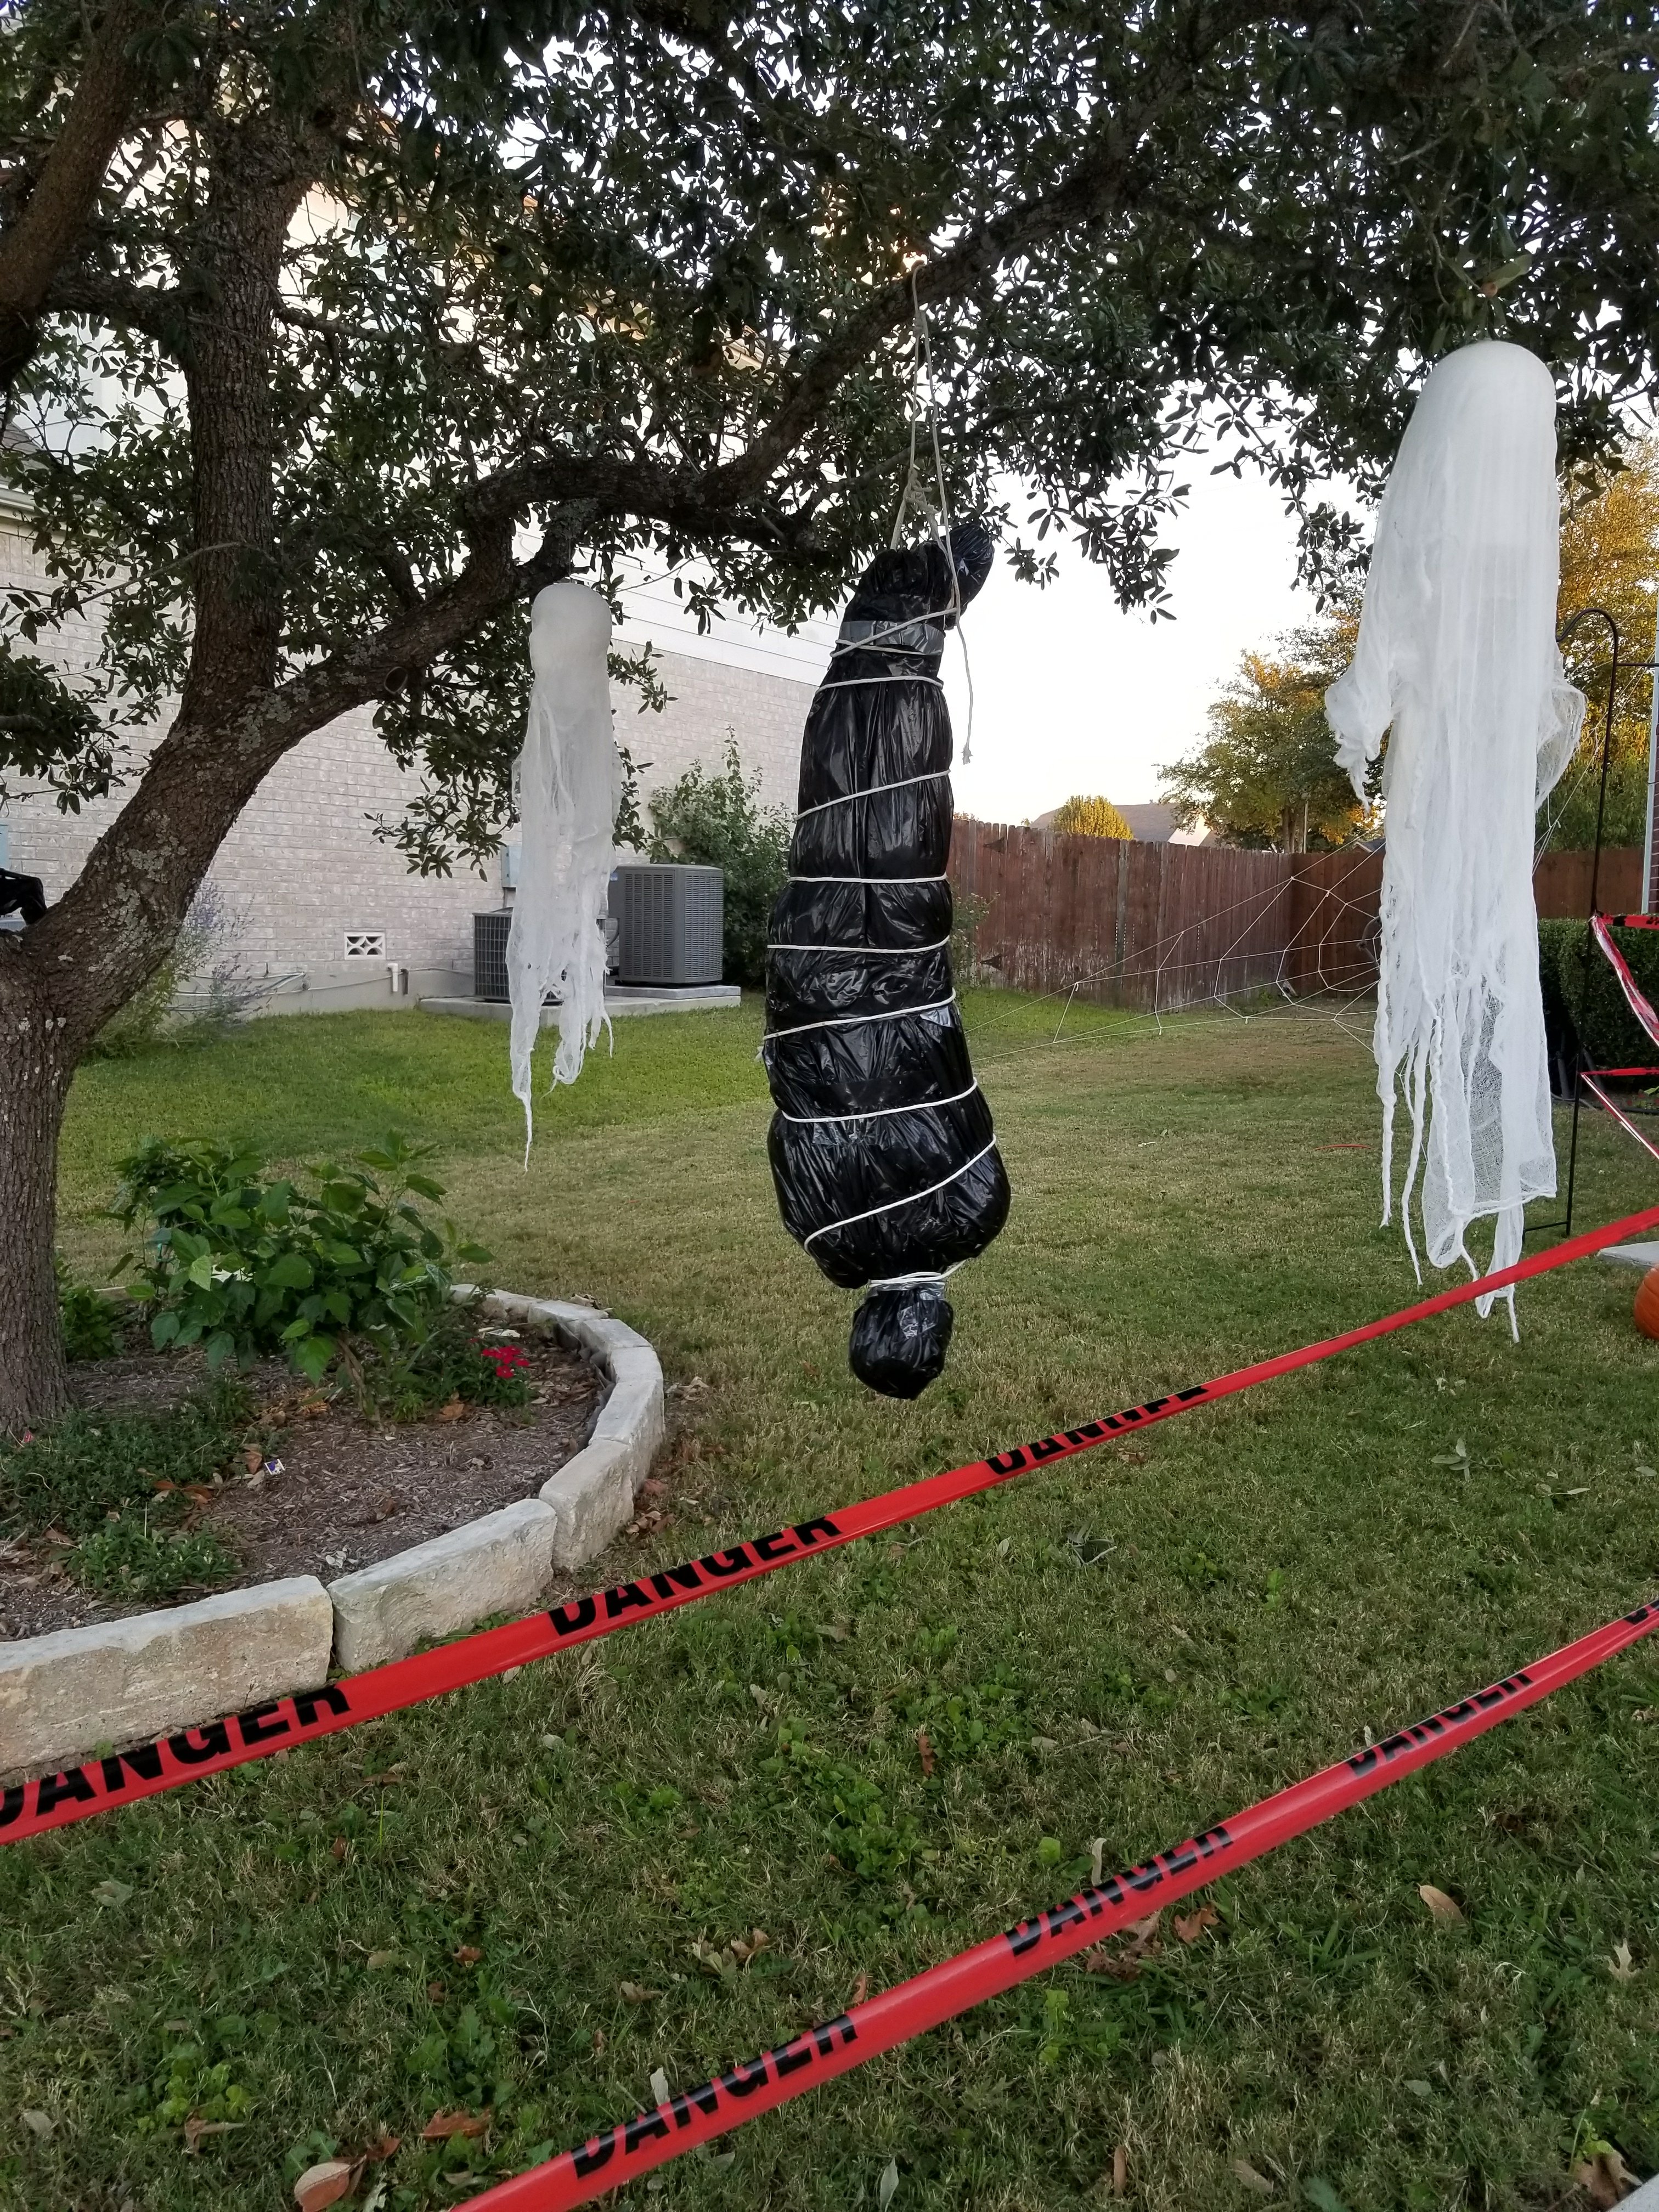
How did you make the black body bag? So cool 🙂
I stuffed a long sleeved shirt and jeans with newspaper. I used an old pair of sneakers and a styrofoam head. Then I cut open black trash bags and wrapped the “body” and duct taped it all together. I wrapped a rope around it to stabilize it all and threw it up into our tree and tied it. It’s really cool during the day but invisible at night. I’d use white trash bags next time or I may train an outdoor light on it. The other problem is that the body is stuffed with newspaper and gets damp and loses shape. It was the first decoration I made for our yard and I no longer use anything that will get ruined with water, like cardboard or newspaper. It’s better to stuff things with plastic bags or bubble wrap. It looks pretty realistic, though, and I haven’t made time to make any major changes to it. But I have had to open it up and run duct tape through the legs and over the shoulders to keep it together after our sprinklers hit it one year and it unraveled, with half on the ground and half in the tree! I think it’s 4 years old now. I’m glad you stopped by! Thanks for the question.
Thank you so much. Very sweet of you! XO
How creative you are!
Thank you! Thanks for coming by and commenting. I appreciate it!
VERY cool and clever project!
Thanks! It was fun!
Hello there ! Love the packing tape ghost idea. What size and how many feet of pvc pipe did you use?
I used 3/4 inch 10 foot pvc pipe. It’s the cheapest I could find and you don’t need anything bigger. Because it comes in 10 foot sections, you can cut it in half, if you can’t get it in your vehicle. You should measure the height to the shoulders, where you will put the cross brace on the pvc support. Don’t cut the main length of PVC shorter than that. Great question! Thanks for asking!
Awesome thank you for the information. My ghost came out great, I even used some cheese cloth around her skirt to give it a little extra flow.
Awesome! I’m glad you made it! Watch how you store it. I keep mine in our spare bedroom where it doesnt experience extreme temperatures. I popped her back on her form again this year to stretch her out and she’s as good as ever! Thanks for commenting! I appreciate the visit!
When you put the plastic wrap around, do you do it tight or loose?
You can be messy with this. The more it is folded over itself the better it catches the light. When I made this I went around with the plastic wrap on a pole like a broom handle. I didn’t pull it super tight, just the tension it takes to unwrap the spool of plastic wrap. It needs to be the kind that sticks to itself, so if there’s some loose bits you just press on them and they stick to the other layers. I would only wrap it once between tape layers or it will come loose on the inside and although that would catch more light, if you light it from within you run the risk of melting whatever touches the bulb, or like when mine blew over the first year, you can catch it on fire. I end up lighting it differently every year, so making sure it is solid inside let’s me change up my lighting choices. So, not super tight but tight enough to make it stick together. If your plastic wrap is just hanging loosely and falling off: you have the wrong kind of plastic wrap. It should stick to itself easily. Premium plastic wrap does this.