


This is a great time of year to plan and build raised beds. This is how I built my raised beds and I have given them no supplemental watering in the last two years of San Antonio heat and I’ve had bumper crops with almost no input outside of planting and occasional weeding! This has been a super fantastic bed for me and I will only build duplicates of these from now on!
2014 mother’s day raised beds:
I had a fantastic Mother’s Day!

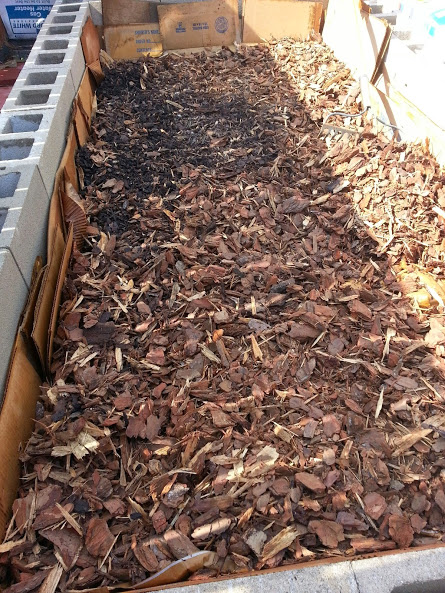
The best part of the weekend? I got another hugelkultur inspired raised bed! Don’t know Hugelkultur? Learn more here: http://www.richsoil.com/hugelkultur/
This is the second year I’ve gotten a raised bed on Mother’s Day and I am super excited! The first one we built is here on my post: “Hugelkultur, Keyhole Gardens: Bridging Ideas”. We did this one a bit differently, but kept the main ideas we used on the original Hugelkultur inspired bed.


Expect to have the giant grubs if you are in Texas. You can see my solution on my post “When Life Gives You Grubs, Serve Them Nematode Tea!” I’ve seen a lot of queries about giant grubs on search engines from people down here so I know I’m not the only one!


Please refer to my post “Making Sense Of Old Sayings” to help you learn the importance of building great soil and how to recognize good bagged soil.
Don’t know if you are dealing with hot or cold manure? Read up on adding valuable natural fertilizers to your soil here: http://www.garden.org/ediblelandscaping/?page=201104-animal-manures and here: http://www.moongrow.com/organic_gardening_guide/fertilizers/manure.html
Here’s a site that explains why our rabbit is my favorite source of fertilizer: http://www.vegetablegardener.com/item/8156/rabbit-manure-in-the-garden

In the last bed I used another concept called Keyhole Gardening. There is a beautiful how to video from Africa on this concept and it makes the idea really easy to understand: http://youtu.be/ykCXfjzfaco . I tried this with the last bed I built. Over the year that it’s been installed: the feeder areas that I made with chicken wire have collapsed. This year I am going to use different, more permanent materials (three large pvc pipes with holes drilled in it for drainage instead of chicken wire) and add another aspect to it: worms! I got the idea from this blog: http://milkwood.net/2010/10/12/how-to-make-a-worm-tower/
So, I’m creating 1-3 permanent worm bins inside the bed. I may put one in and see how I like it and add others later. The site above calls it a “worm tower”. This is the basic idea of the keyhole garden which is set up to feed and water the beds, but with updated materials…and some red wigglers, which will do fine as a permanent outdoor worm bin in our climate. I love the new addition to the theme because: I have no interest in keeping up with feeding and emptying independent worm bins. I also was wondering how I was going to keep critters out of an outdoor bin full of wonderful kitchen scraps and yummy worms. We’ve already got armadillos in the yard tearing up areas looking for grubs. So far, they have stayed out of the raised bed.

On the to do list: My husband is going to enclose the garden with fencing. I had trouble with opossums in my melons last year so I will probably end up using electric fence in conjunction with the fence my husband wants to put in.
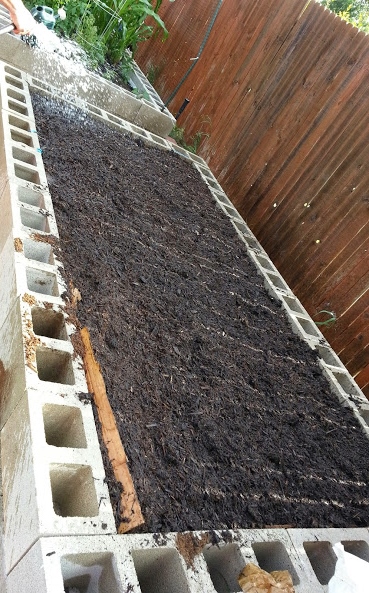
This bed is cheap to construct, permanent, easy to maintain and I don’t have to deal with our crummy natural soil. I will be planting it this weekend.

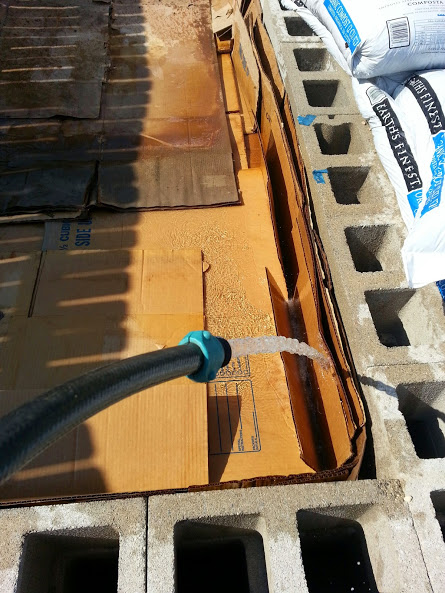
Watch for next weeks post! I will teach you a great way to water your raised beds and keep it from losing water to evaporation. Down here in the summer we have days over 100 degrees for weeks at a time on top of water restrictions. They have promised an El Nino year which will hopefully end our drought but will bring torrential rains. Either way, this bed is going to provide us with a great area to grow veggies this year, and for years to come!
Want more information? The “Gardening Basics” tab at the top of this page will walk you through everything you need to know to start you on the path towards a successful gardening experience. The information is free and I’m genuinely interested in helping you succeed. Let me know if you would like more information on specific topics for future posts. I’m here to help. Good luck and go out and get your hands dirty!
Get updates on this blog via Facebook here: www.facebook.com/CrazyGreenThumbs
Discover more from Crazy Green Thumbs
Subscribe to get the latest posts sent to your email.

That’s an amazing idea. I just told my husband I want some of those and he said NO!. Bummer.
For us the time invested and the price were the lowest of all of the options we compared. The blocks are $1.32 each and there are flat cap stones to place over the tops of these that are about $1.38 a piece. They make the block more attractive. The cinder blocks won’t rot like landscape timbers and won’t leach creosote like railroad ties will. Good luck with whatever you end up using. The hugelkultur and other ideas for the center of the bed will still be usable no matter the product you use to contain the bed. Thanks for coming by! I appreciate the visit!
I have already decided to use this method instead. It just make take some saving up. Thanks for responding. I had forgotten about the creosote and that is a good point. I think I would rather do the cinder blocks.
Lol…just want to clarify. The cinder blocks are too expensive right now. He did come back and say maybe we can do this with railroad ties or gardening timbers.
Sooooo cool! Not something I can do on my apartment balcony, but I’m definitely passing it along to friends.
Keep watching my blog! I’ve got a post on how to green your apartment coming soon. Thanks for stopping by. I appreciate it!
Cool! So far I’ve got some morning glories started and a bunch of chives in a big filled-in tupperware tote with some holes drilled into it for drainage. I’m interested both in ways to do big things well and ways to get a really thriving window-box.
I just interviewed a landscaping gardening business and I thought I would be bored hearing about mulch, but the guy was so passionate about it that now I’m fascinated! I have a black thumb you see, every plant I touch seems to die (this is an embarrassment as a spring baby :/) I have always admired those who can take the time to set everything up and create such natural works of art. I can’t wait to see what you plant and consider me a new follower. I want to learn all about gardening now and hopefully, like a mood ring, the color of my thumb can change. 😉
It just takes patience, practice and a few good tips! I’m glad you’re on board! I hope we can change your views on the color of your thumbs. Thank you for stopping by. I appreciate the comment!
Yay a hugel! I made one for my mother last year for her birthday–they work really well here, too. We get swampy in winter, and the bottom layers suck up all that water and keep it for the plants. If I could, I would put them all over our property. Great post–very informative.
Thank you so much for the reply! I appreciate the comment and the visit.
Interesting and informative post. I do a lot of container gardening and the Wet As You Go tip is very important. You are right, it is impossible to wet thoroughly from the top.
I’m glad you enjoyed the post. Raised beds are basically just huge containers. The care between pots and raised beds are very similar. Thank you for coming by. I appreciate it!
I have my garden growing in a Western facing window, with pots of mint, garlic chives, onion chives, pea shoots, lettuce and a mystery thing I forgot to label growing up out of one pot. I have a tendency to take the root ends of my fresh veggies from the grocery or Farmer’s Market and stick them in potting soil just to see if they will sprout. I don’t get vegetables, but do get some interesting chives and greens. I do miss my farm with the garden and the raised herb beds.
It’s hard to downsize when you have had a large garden. We had to rent for a while when we first got to Texas. I had an elaborate container garden to help me get through it! I’m glad you have made space to continue to tinker with plants. I think gardening becomes an addiction to nurturing any and all potential plants that we come across. I’m glad you enjoyed the post! Thanks for coming by.
It really is hard when you’ve lived on a farm all your life and suddenly hit a turn in the road and have to be closer to the neighbors and potential help in emergency situations. Even last year I had a share in a garden on the other side of the county, but broke my shoulder during the winter and haven’t built up enough strength to handle all the produce this summer. Next year though….
Definitely! I was in a wheelchair last year for mother’s day with MS like symptoms. It’s been a long row to hoe to get my strength and motivation back. I’ll keep you in my thoughts. Life sends us experiences and sometimes all we have control over is how we choose to react to the new rules. Good luck!
I found a dill weed today to add to my window garden. It’s not very healthy, but I hope some tender loving care and the western sunshine will lead it back to health.
Just came across your post. I would to have the room for something like this.
Have you considered planting inside the spaces in the cinder blocks too, rather than cover them over?
I was thinking a bit like this: http://followpics.co/cinder-block-raised-beds/
It would be very hard to keep them watered down here. The cinder blocks wick moisture which is why we put a tarp on the interior of the first one we made. South Texas heat is unique and you might be able to plant the holes in an area with cooler summers and more rain. If you do I would still recommend using something drought tolerant like wildflowers to attract bees to your bed or annual herbs. I’d let them go ahead and bolt because flowering herbs have attracted the most bees for me down here (especially basil). If you find the holes won’t support any plants they will still help insulate the bed as far as wicking moisture. Good luck! Thanks for coming by.
I like your project but please, please don’t share your idea with my wife. Thanking you in advance.
Regards and good will blogging.
Hehehe! I can’t help you if she finds it on her own. Thanks for coming by! I appreciate the visit.
OMG… I am a big fan of Hugelkultur! Put in a raised H. bed last fall. Wanted to do another this spring, but I messed up my knee and am (sob, sob) out of gardening for the next couple months.
Thank for visiting my blog. I’m looking forward to getting to know you, and I like your site. I also have a tri-color Australian Shepherd (named Sylvester, after the black and white cat). He’s a senior now so he’s got a lot of gray in his face. I loved seeing the pic and reading about Christmas. Oh yeah, I have a house rabbit too! Funny, huh?
That is a LOT of similarities! Thank you so much for coming by. I appreciate the visit!
Reblogged this on Last Night's Parties and Last Night's Horrorshow.
Hi crazy green thumb’s blog. Thanks for checking my Reclaiming a Beauty 53 blog. I love your hugelkultur bed blog and the photo aided details. My students at an elementary school in BC Canada have used garden boxes, but I love the extra ideas of cardboard as a base with the compost worm homes which I want to try! I look forward to reading back through your blog history and into the future. – Carol
Thank you so much for the compliment! I’m glad you enjoyed the post. I really liked your one minute gratitude photo. I strive to achieve the same goals. Thanks for coming by. I appreciate the visit!
What a fabulous Mother’s Day gift! You’ve raised your sons well to have them so involved in family gardening 😉 Best wishes, WG
Thank you so much! I’m glad you came by. I appreciate the visit!
What a cute cake. You certainly have some special men in your life
Thank you! Yes. I have a great family! Thanks for coming by. I appreciate it.
This is one of the best tutorials for a raised garden bed. Thank you so much! Now I have to scour the neighborhood for cement blocks 😉 I just have to make a raised garden bed this season!
I’m really glad you enjoyed the post! Thanks for coming by. I appreciate it!
Thank you SO much for posting these instructions! We need to build a 2ft X 16 ft raised flower bed next month (beside our new deck!) Instead of wood, I think we will use this method instead. Woo-hoo!
You are very welcome! Having used wood on an older property for a raised bed I definitely prefer the cinder blocks. Fast and permanent!